¶ 🔥 Case Study: Stronger, Faster 3D Prints with Helio
With Helio Additive’s assessment and enhancement tool, we achieved:
- 💪 +65% increase in tensile strength (30.4 MPa → 50.3 MPa)
- ⚡ 40% faster print time (1h 43m → 1h 2m)
- 🌡️ Thermal conditions shifted from overcooled to optimal bonding ranges
- 🧠 Critical insight: cooling fan was hurting bonding — assessment revealed the issue
No material changes. No hardware changes. Just smarter G-code.
¶ 🔁 Terminology Update
Helio’s core capabilities were previously referred to as Simulation and Optimization.
These have been renamed to better reflect how users interact with the product:
Assess → previously Simulation
(Analyzes thermal behavior and print conditions before printing)Enhance → previously Optimization
(Improves G-code to achieve better strength, quality, and print time)Throughout this case study, we use the current terminology: Assess and Enhance.
¶ 🧰 How to Do This Yourself
- Slice your model normally in Bambu Studio
- Run the G-code through Helio using the Bambu Studio plugin.
- Review thermal maps and adjust fan or speed settings if needed.
- Print stronger parts, faster!
¶ 🛠️ Stronger, Faster Prints with Helio
We tested how much print performance can be improved using Helio Additive’s engine, compared to default slicer settings in Bambu Studio for polycarbonate (PC) material.
This report explains what we tested, what the results mean, and why this matters — in simple terms anyone can understand.
¶ 🧪 What Did We Test?
We printed and tested standard tensile test parts using two approaches:
- Using Bambu Lab’s default PC settings
- Using Helio-enhanced G-code
Then we compared:
- How strong the printed parts were (tensile strength)
- How long each print took (print time)
- How well the temperature was maintained during printing (thermal index)
¶ 🔍 What is a Tensile Test?
A tensile test checks how much pulling force a part can take before it breaks.
To do this, we used a standardized part shape called the ISO 527-2 1A tensile bar, scaled to 50% in height. These samples were pulled in a mechanical tester until they snapped, and we recorded the tensile strength in MPa (megapascals).


¶ 🧪 How We Printed the Test Parts
To make sure each of the five test samples was printed the same way:
🧵 We printed them one at a time, in sequence.
This made the printer always start each part from the same position, with the same toolpath and cooling conditions.
By doing this, we avoided any differences that might happen if the printer moved between parts (like uneven cooling or timing). It helped us make sure that any change in strength came from the G-code optimization — not from how the parts were arranged or printed.
¶ 📚 Key Terms Explained
¶ 🔗 Bonding
Bonding is how well each printed layer sticks to the next one. Poor bonding leads to weak parts. Good bonding happens when the new layer melts into the previous one while it’s still warm.
¶ 🔥 Thermal Index
This is a value that helps us understand how close the print temperature is to ideal conditions for bonding.
The thermal index ranges from +100 to -100, where:
- +100 (Red): Too hot – risk of collapse or overheating defects
- -100 (Blue): Too cold – weak bonding and risk of cracking
- 0 (Green): Optimal – the “Goldilocks zone” for best performance
¶ 🧪 Tensile Strength (MPa)
This is how strong the part is when pulled apart. Higher MPa = stronger print.
¶ 🕓 Print Time
Total time the printer takes to finish the job. Faster is usually better — as long as it doesn’t hurt quality.
¶ ⚙️ What is Helio?
The Helio plugin in Bambu Studio is a product by Helio Additive that assesses and enhances your G-code before printing.
It helps you:
- Adjust speed layer-by-layer to improve bonding and reduce thermal stress
- Analyze how temperature affects print quality
- Find the fastest way to print without sacrificing strength
🧠 Helio doesn’t just optimize blindly — it uses a physics-based assessment to predict how your part heats and cools in real time.
📌 Current Capabilities:
- Automatic speed optimization for strength and time
- Thermal assessment with actionable insights
- Manual fan adjustment based on recommendations
📌 Coming Soon:
- Automatic fan speed optimization
¶ 🌀 The Power of Assessment: Catching the Problem Before You Print
The Challenge: Polycarbonate is notorious for poor layer bonding when it cools too quickly. But how do you know if your print is cooling too fast before you waste hours on a weak part?
The Solution: Helio’s Assessment tool analyzes thermal behavior before you print, revealing issues that aren’t visible in your slicer.
¶ What Assessment Revealed
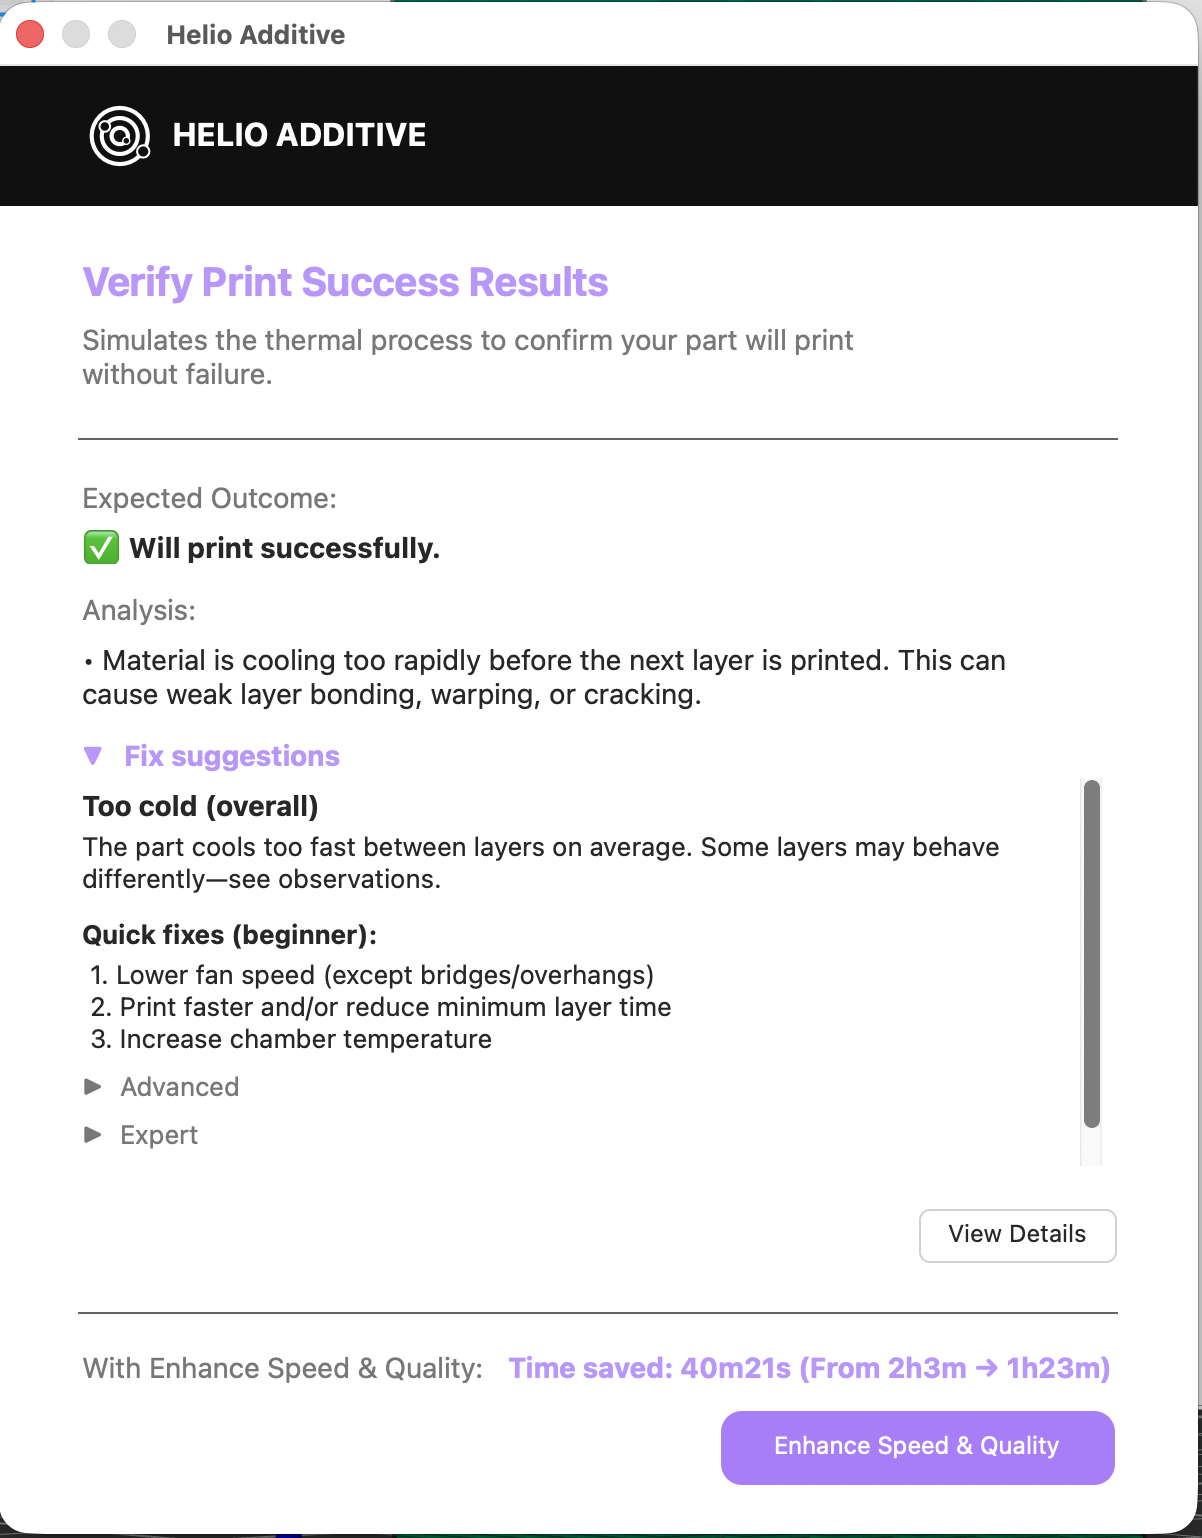
Assessment identified overcooling and specifically recommended disabling the part cooling fan
Running assessment on the default G-code showed:
- Problem: Layers were cooling too quickly before the next layer deposited
- Root cause: Part cooling fan was causing excessive heat loss
- Impact: Poor layer bonding, leading to weak parts prone to delamination
- Recommendation: Disable part cooling fan for this material/geometry combination
¶ Following the Assessment Recommendation
Based on this insight, we:
- Disabled the part cooling fan as suggested
- Ran Helio’s enhancement to optimize print speeds
- Printed test samples and measured tensile strength
¶ ✅ Results Summary
| Metric | Default Settings | Helio Enhancement |
|---|---|---|
| Avg. Strength | 30.42 MPa | 50.28 MPa (+65%) |
| Print Time | 1h 43min | 1h 2min (-40%) |
| Thermal Quality | Predominantly overcooled | Within optimal bonding range |
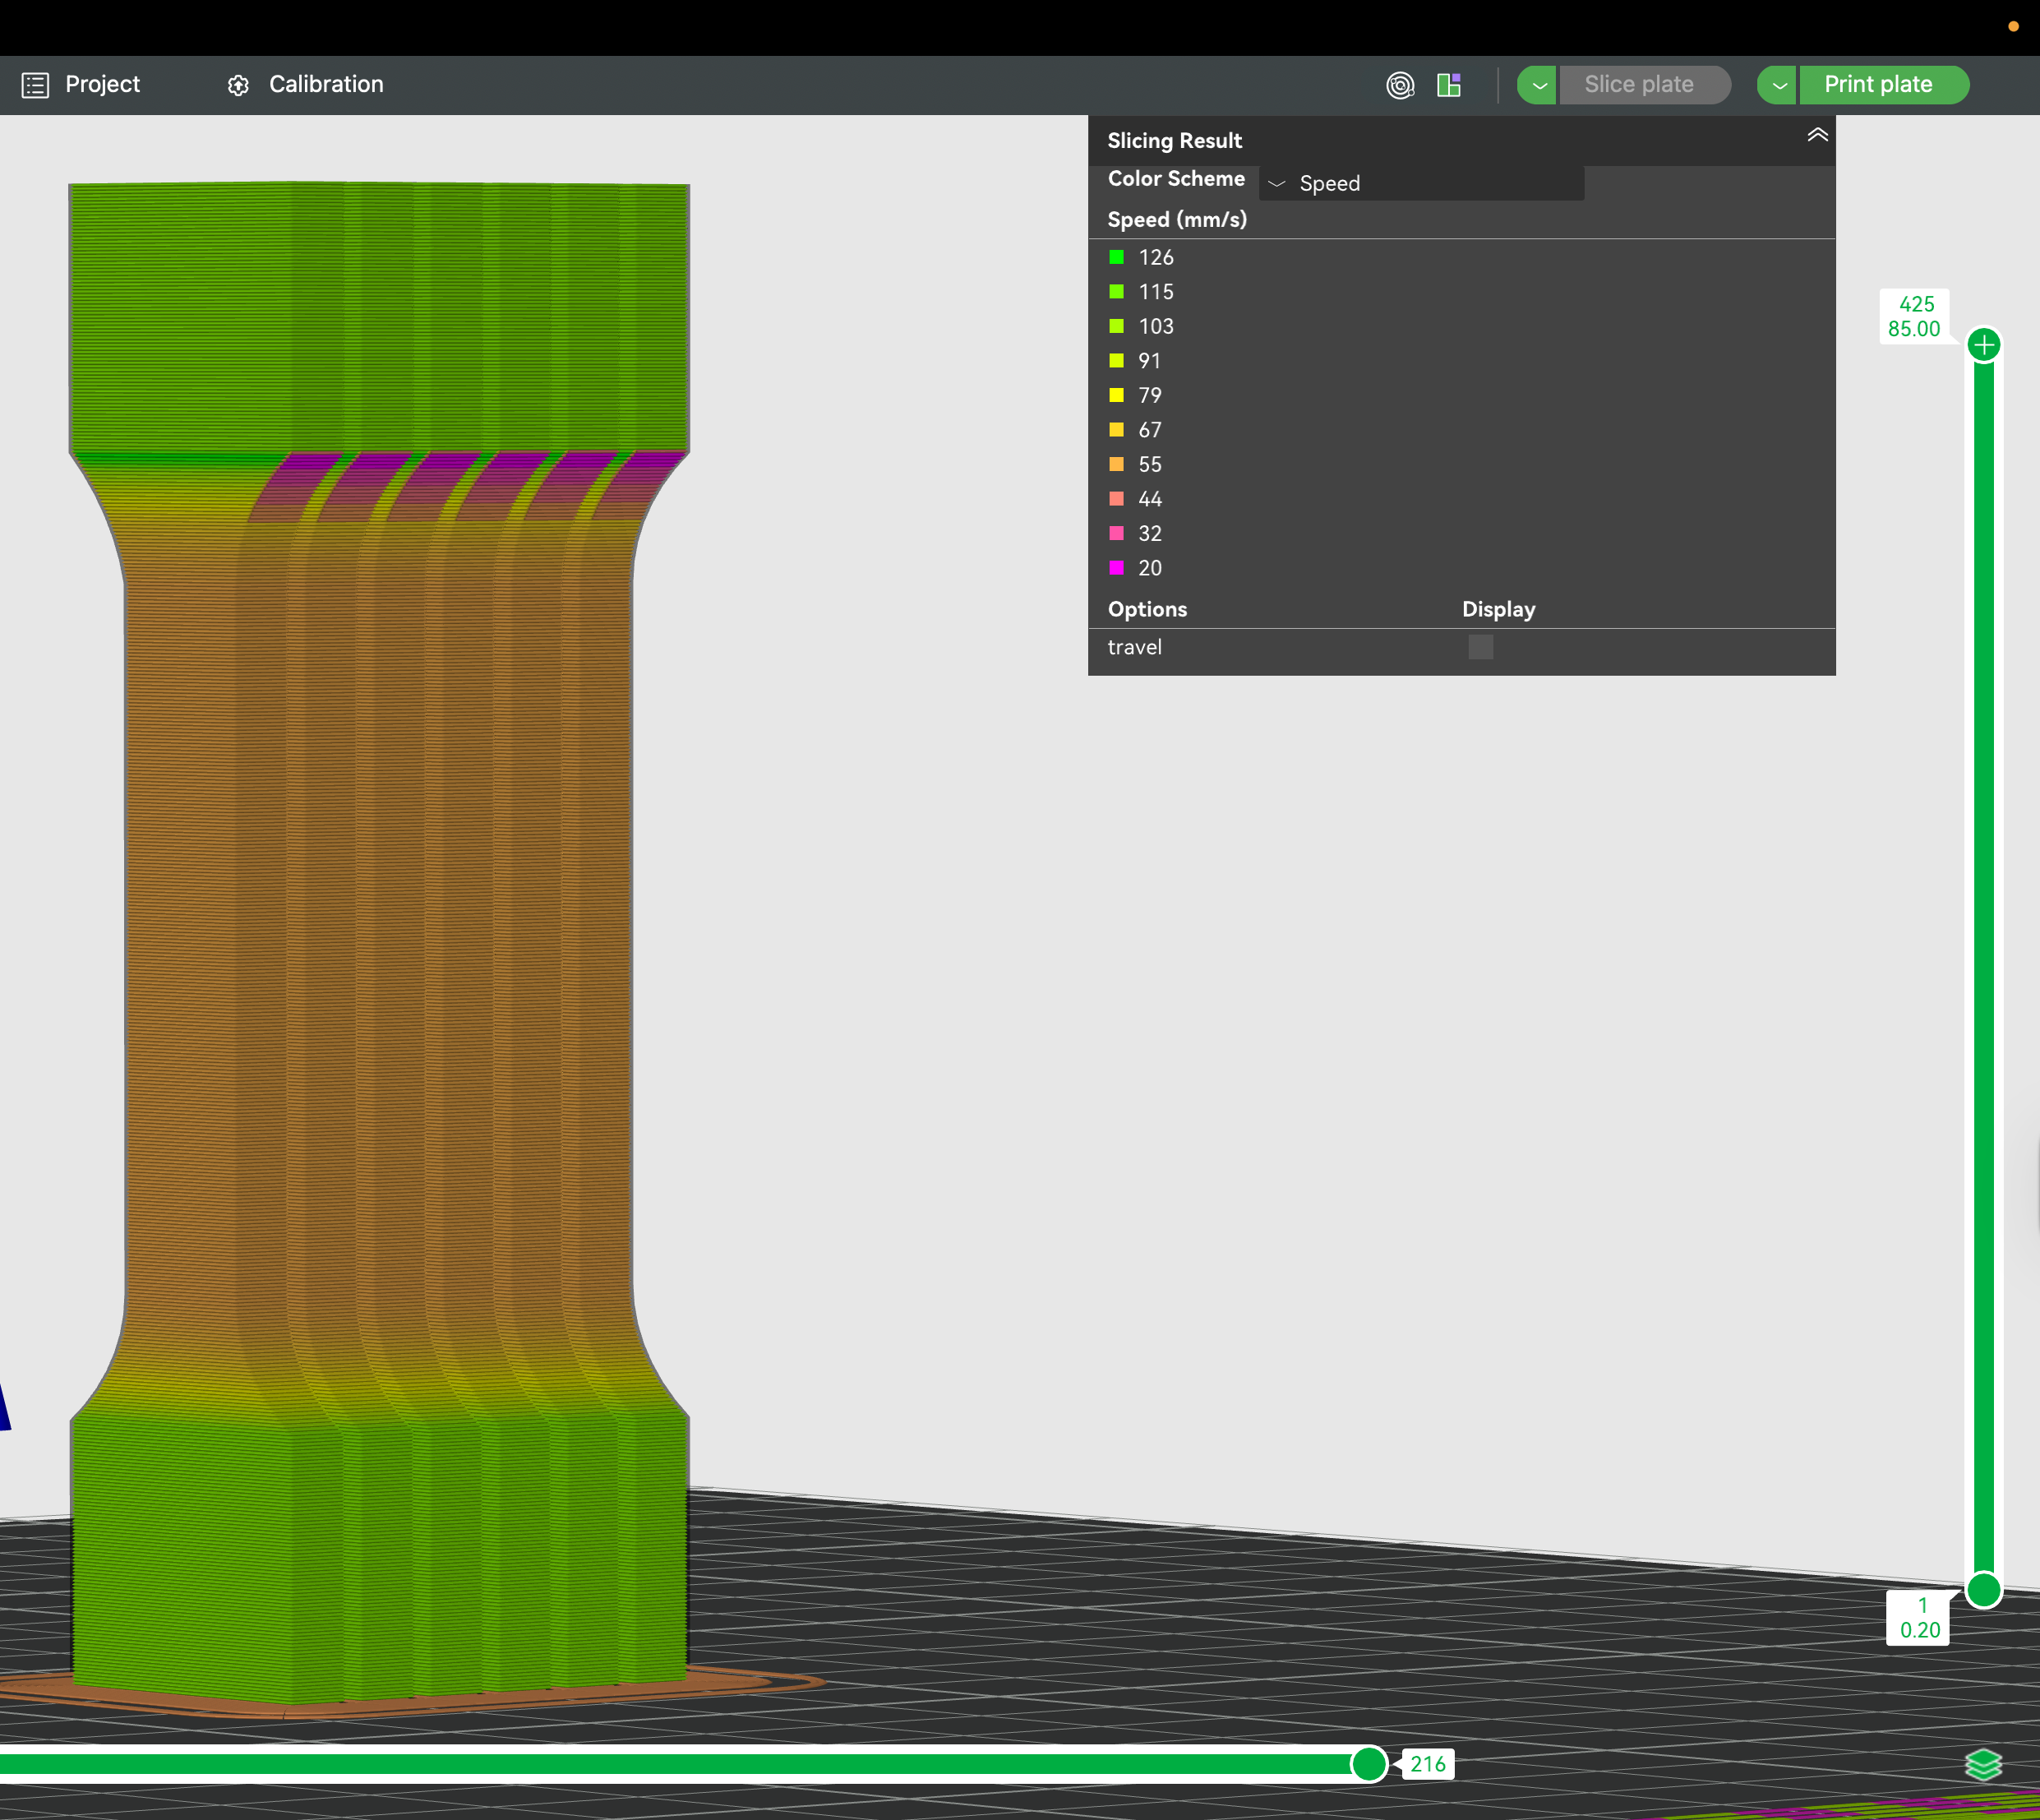
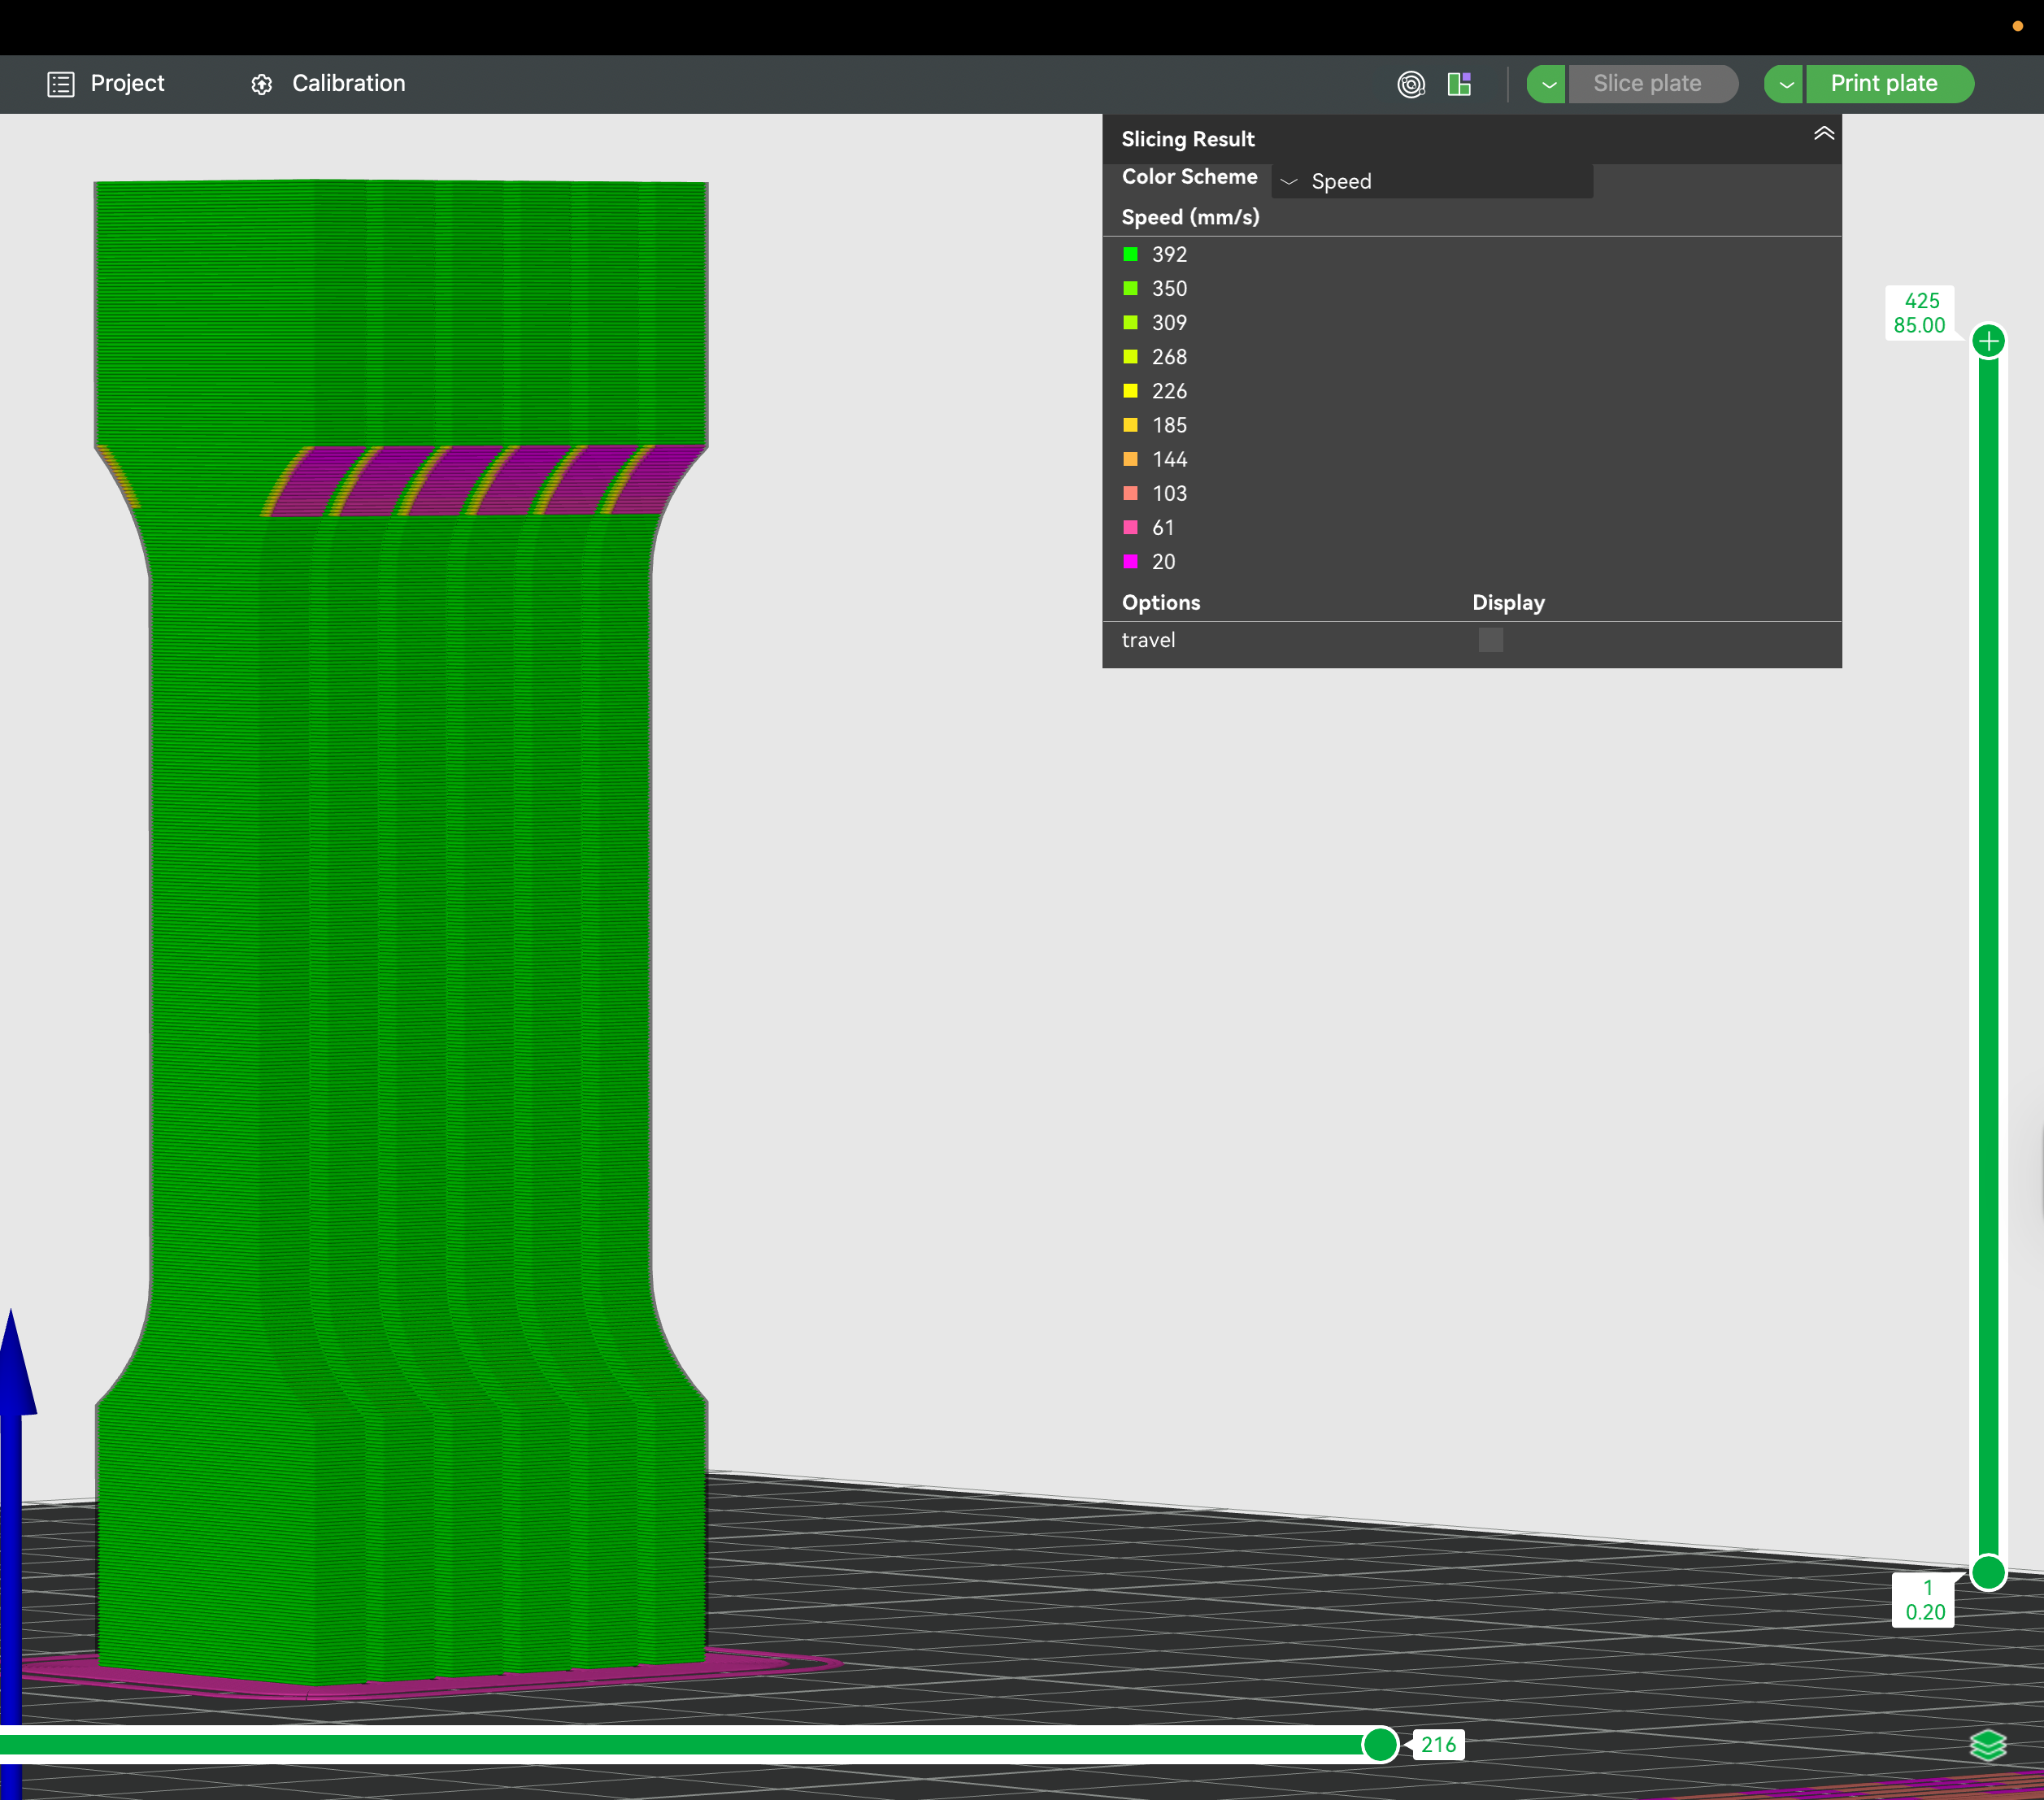
¶ 📈 Visualizing the Improvement
¶ Thermal Quality Comparison (Red = Too Hot, Blue = Too Cold, Green = Better Bonding)
¶ Default Settings: Assessment Results
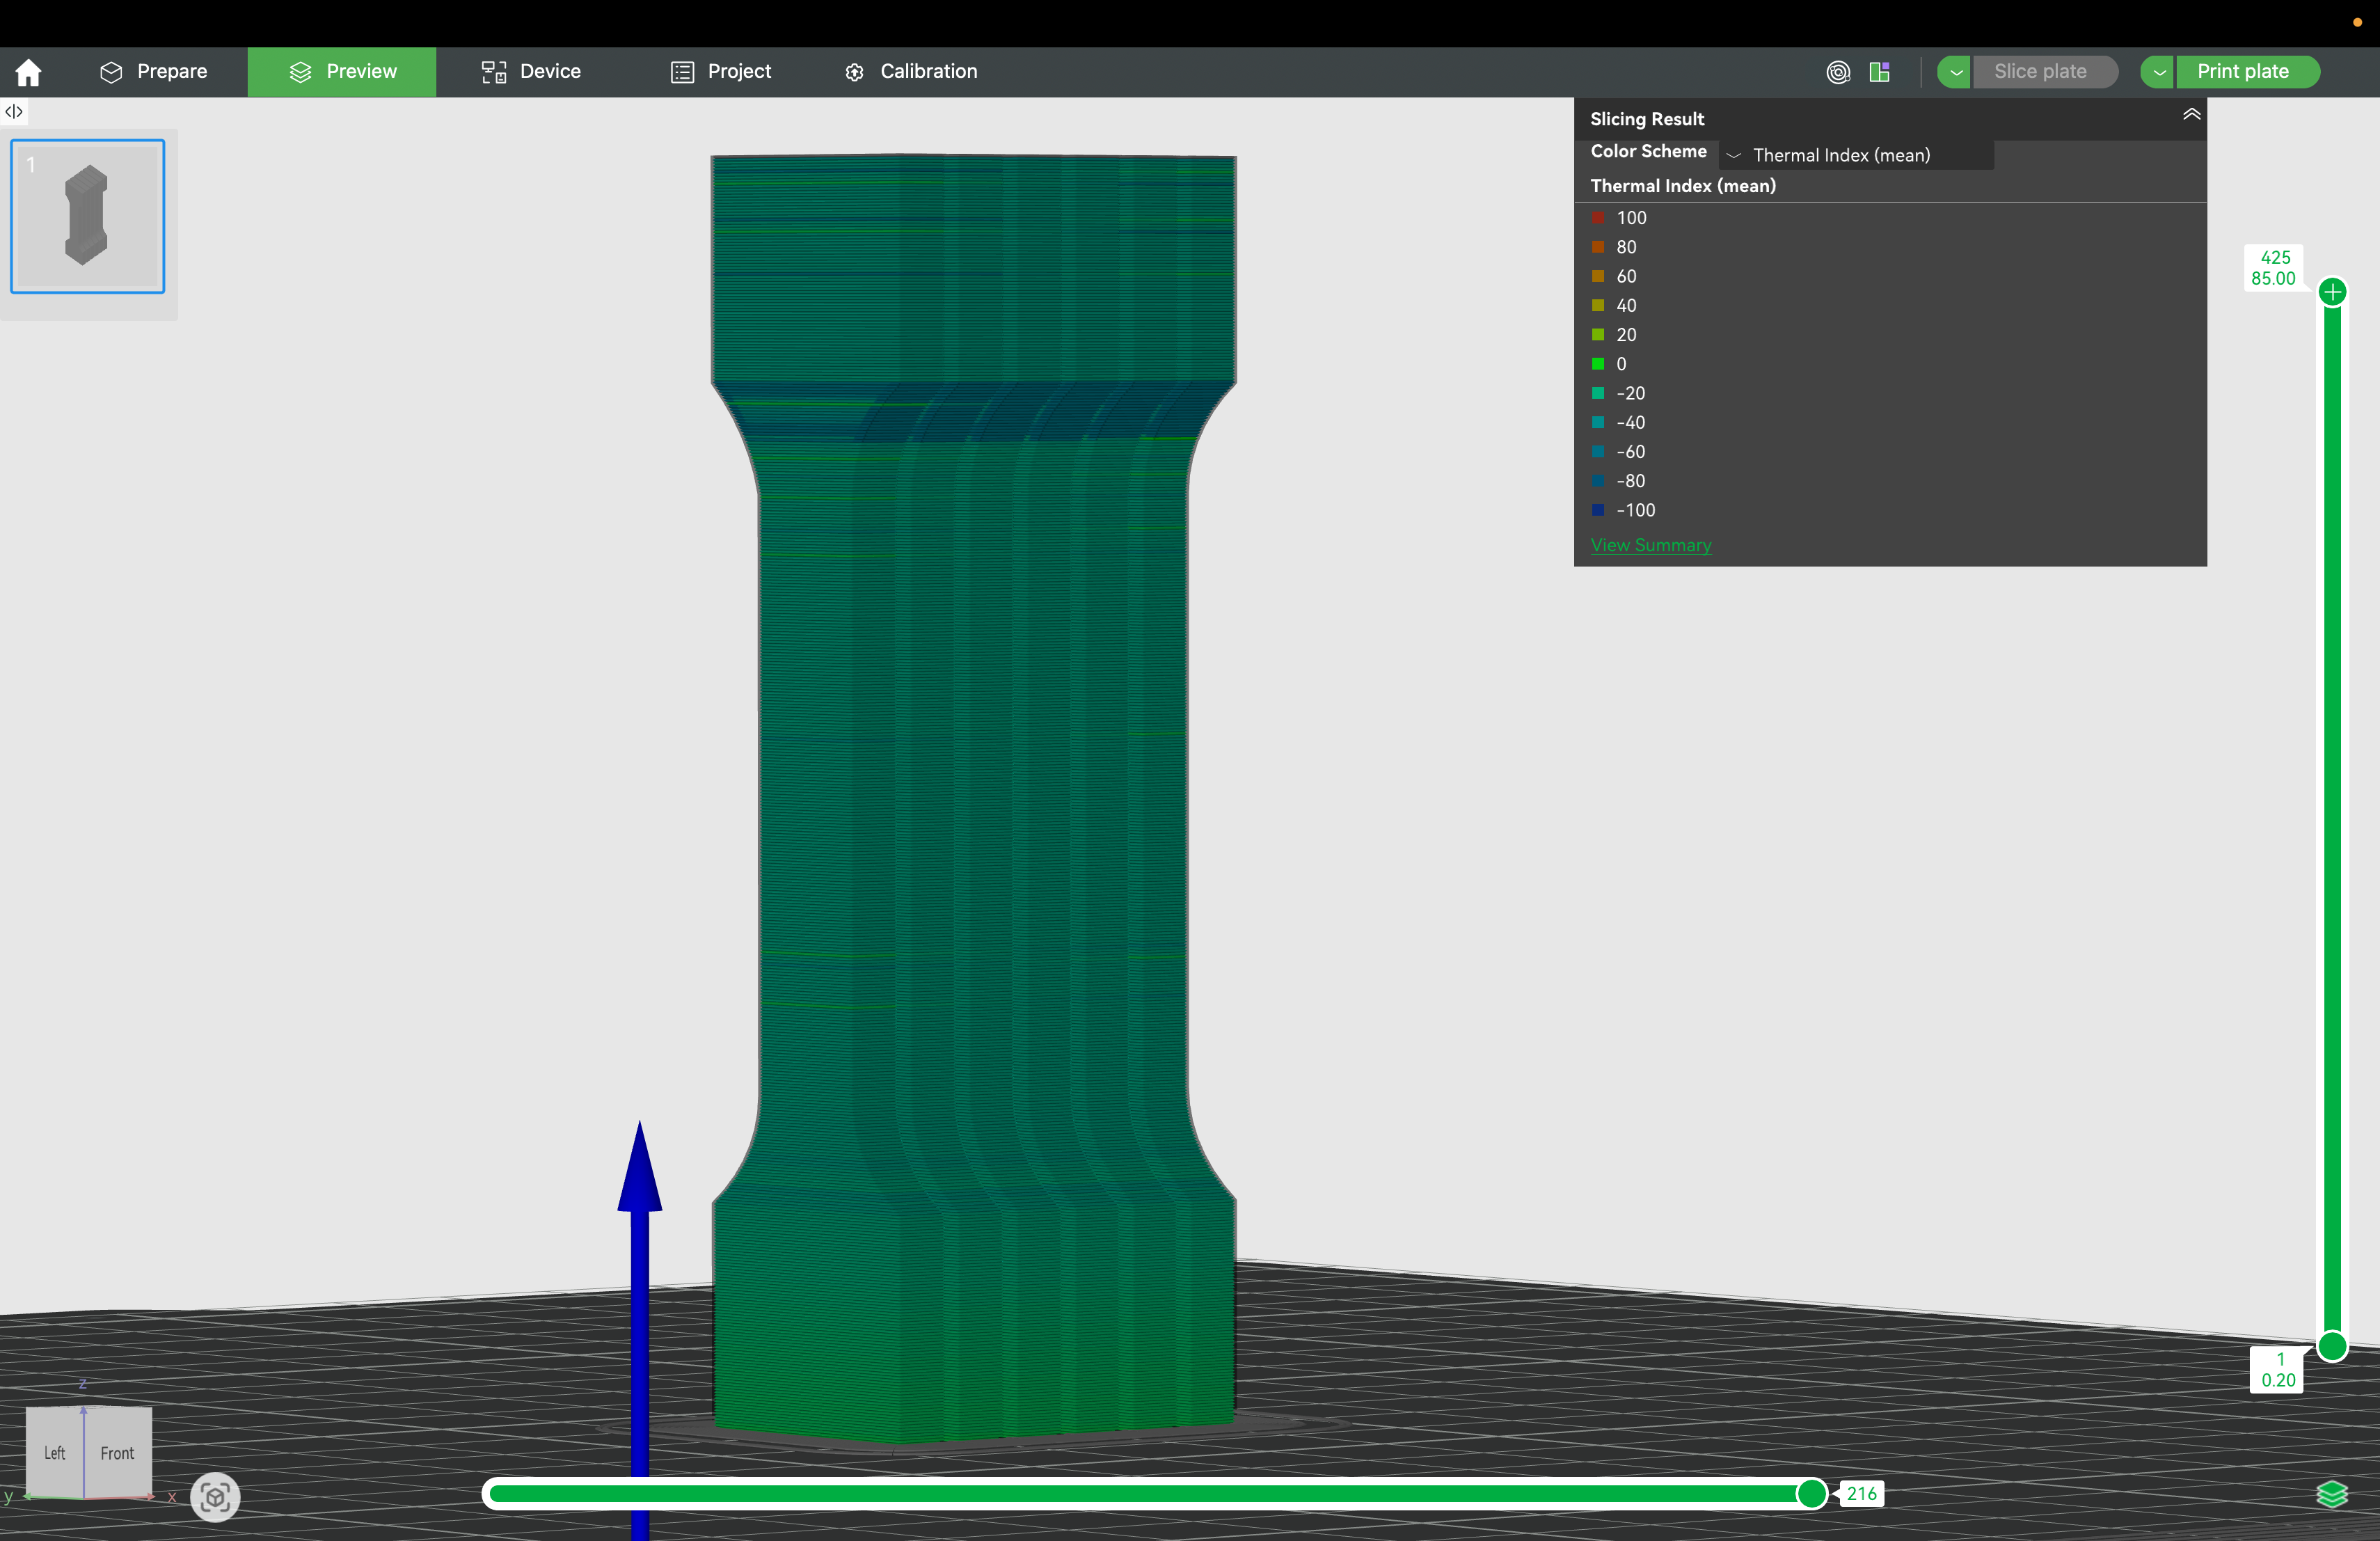
Default settings show significant overcooling (blue regions), especially in upper layers where the fan prevents proper bonding temperatures
¶ Enhanced (Following Assessment Recommendations): Fan Disabled
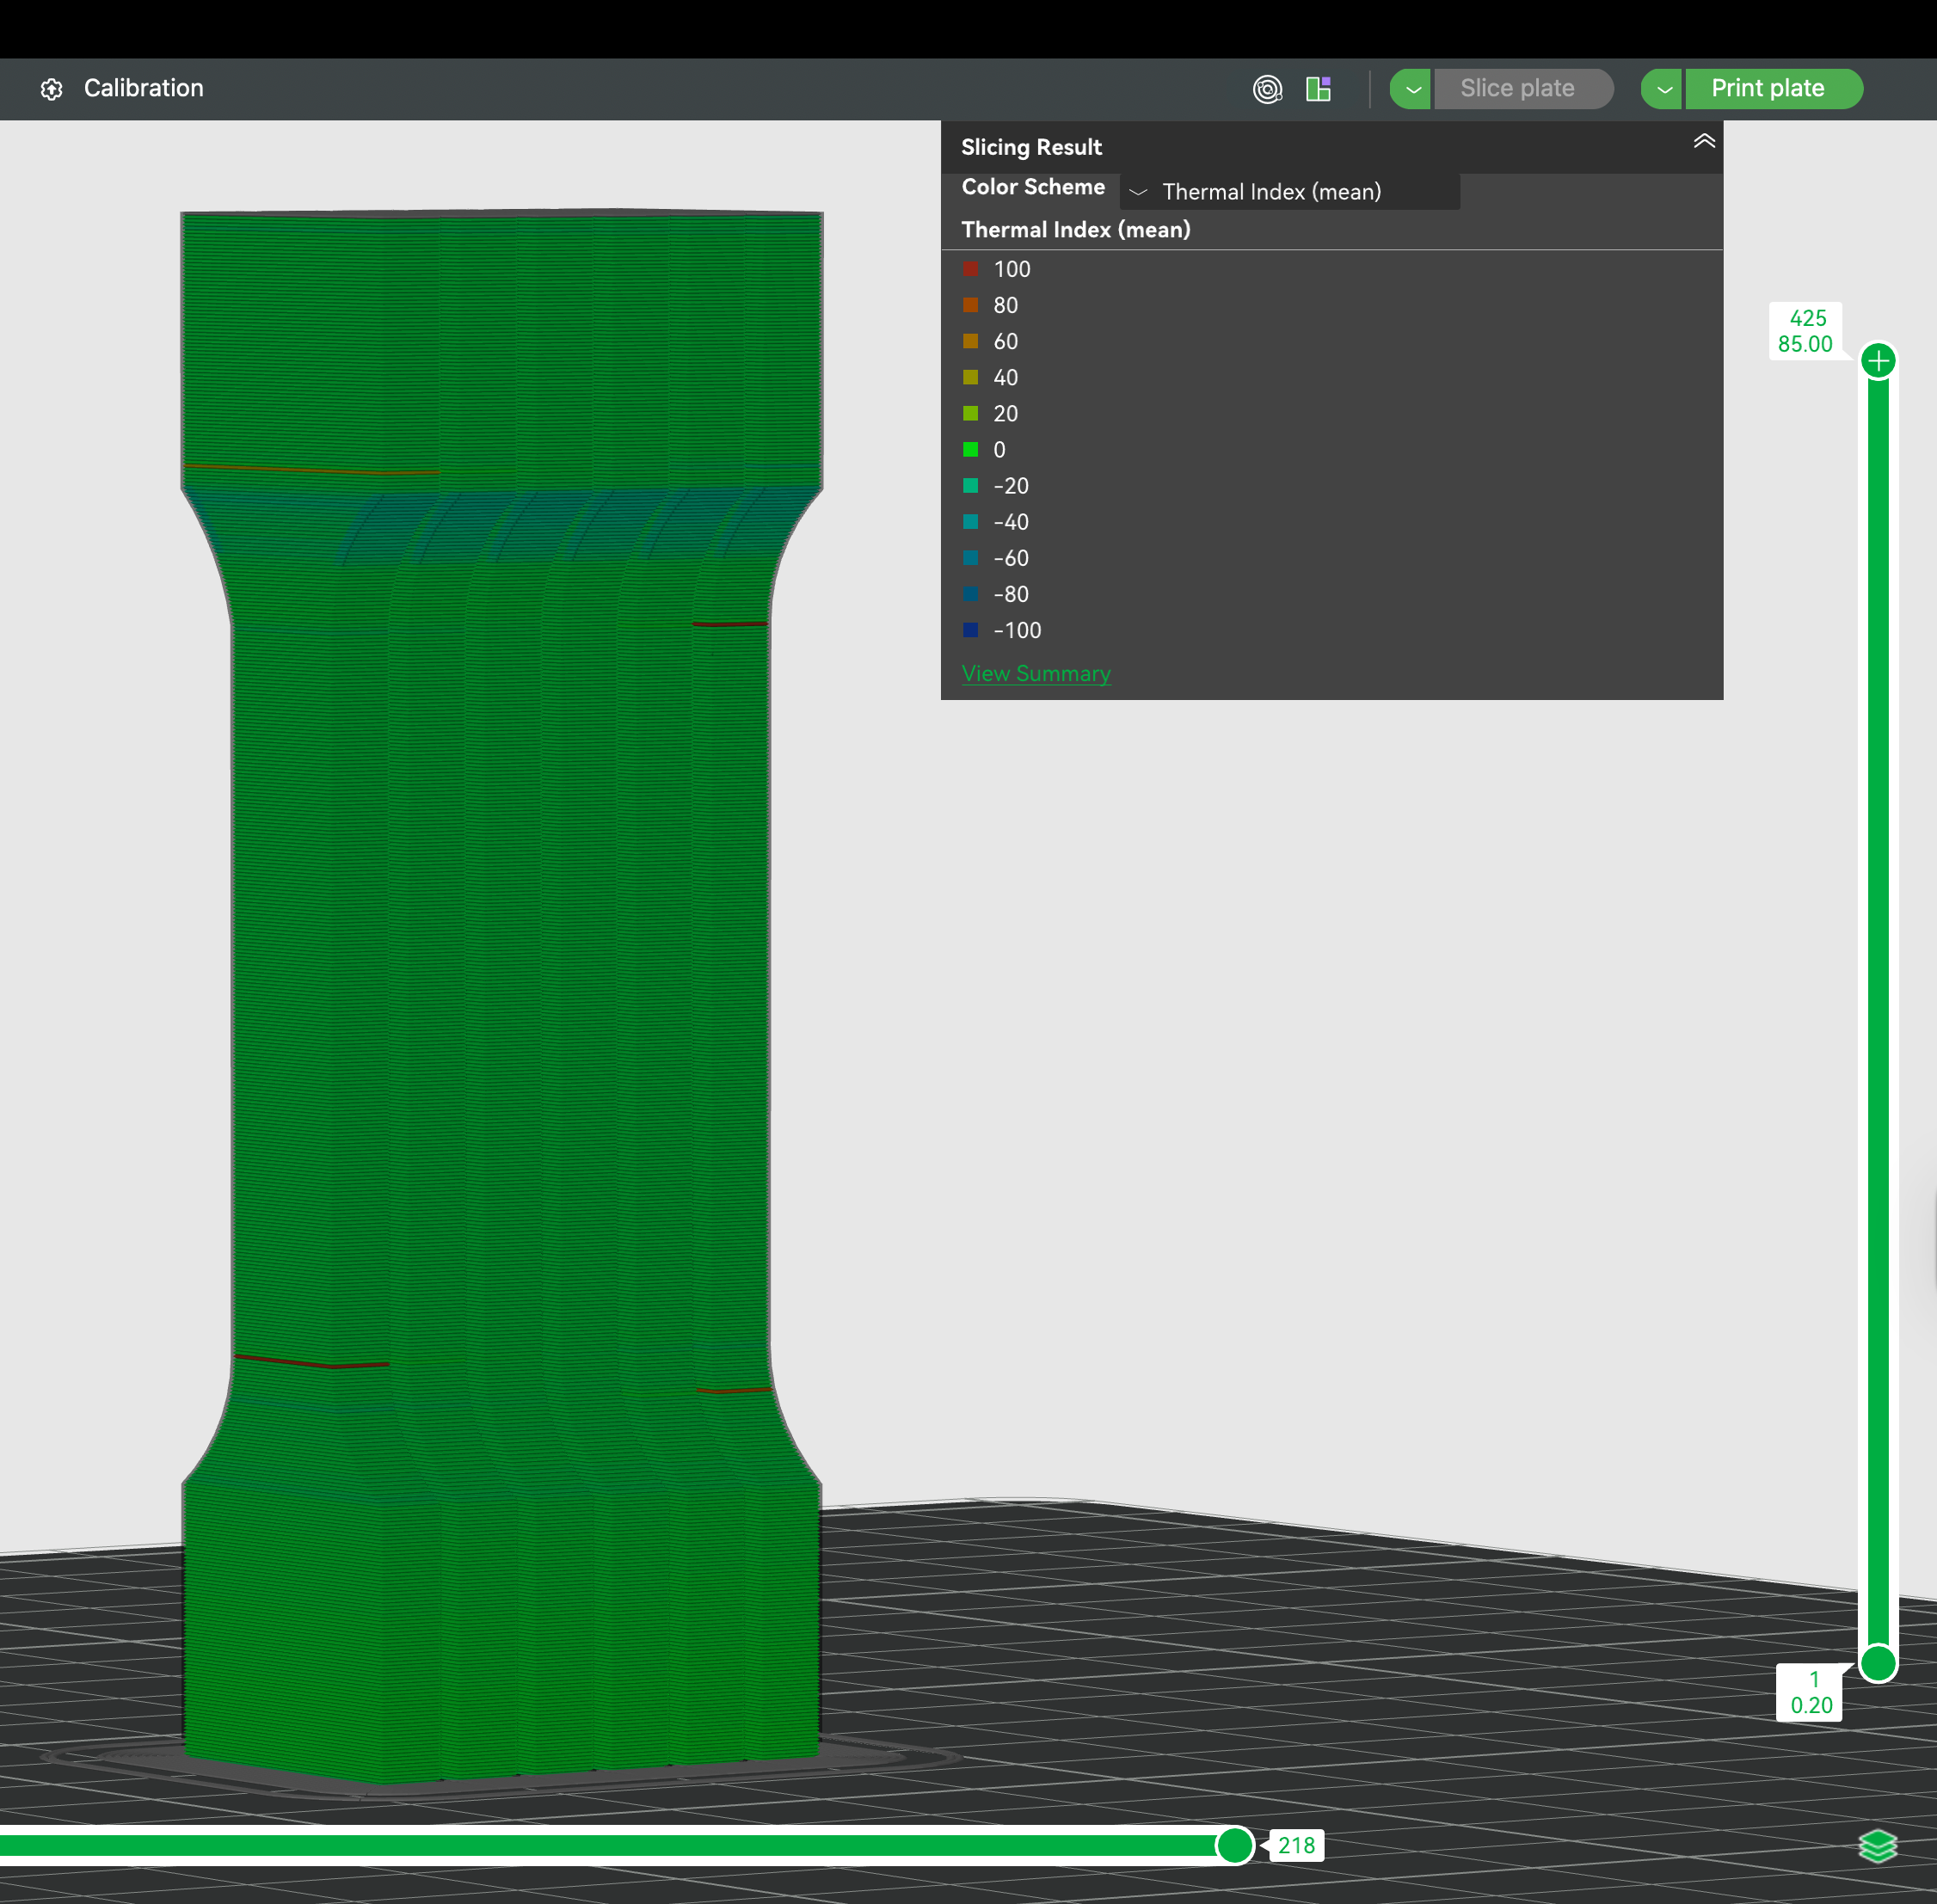
With fan disabled (per assessment) and speeds optimized by enhancement, thermal conditions stay within optimal bonding range throughout the print
¶ 🧪 Strength Results Per Sample
Each part was printed, tested, and the results logged:
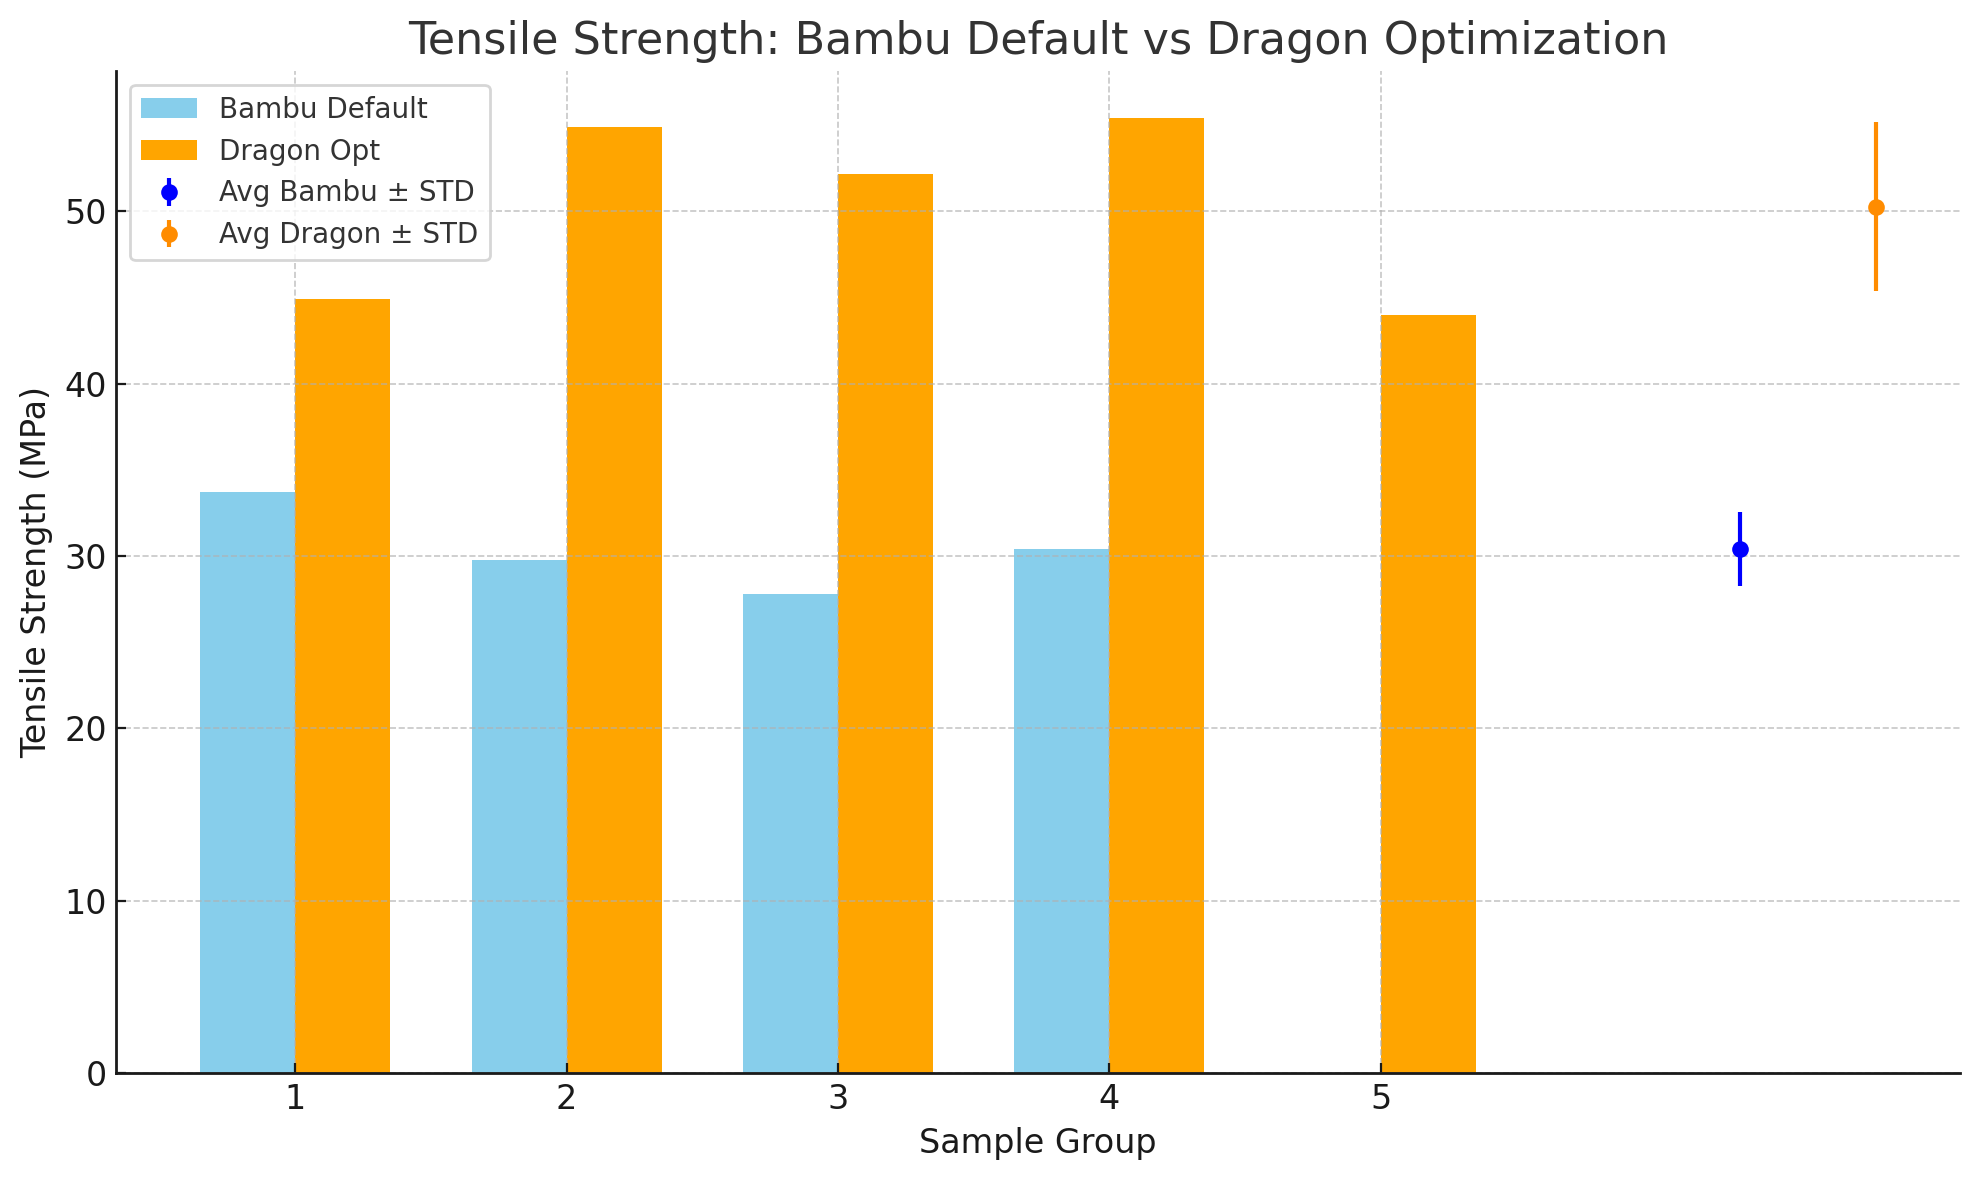
| Sample | Bambu Default (MPa) | Helio Enhancement (MPa) |
|---|---|---|
| #1 | 33.7 | 44.9 |
| #2 | 29.77 | 54.9 |
| #3 | 27.79 | 52.2 |
| #4 | 30.42 | 55.4 |
| #5 | — | 44.0 |
🟠 Helio optimised parts were consistently stronger across all tests.
🧠 Key Insight: Without assessment, we would have printed with the fan on (following standard practice) and produced weak parts. Assessment caught the thermal issue before we wasted time and material.
¶ 🕒 Print Time Comparison
Helio not only improved strength — it also made prints faster:
- Before: 1 hour 43 minutes
- After: 1 hour 2 minutes
✅ 40% reduction in print time
¶ ⏳ Before Enhancement
Before (1h 43 min):

¶ ⚡ After Enhancement
After (1h 2min):

Helio achieves this by printing faster where possible, and slowing down where needed for better bonding.
¶ 🧠 Final Thoughts
If you’re printing parts that need strength (brackets, tools, functional components), don’t rely only on default slicer settings.
Using Helio Additive’s assessment and enhancement tool, you can:
- 🔥 Improve thermal quality layer-by-layer
- 💪 Boost part strength by 50–65%
- ⏱️ Reduce print times without losing quality
- 🧠 Make better decisions (e.g., cooling fan use) based on real data
Need help interpreting your thermal plots or print data?
Reach out to the Helio Additive team — we’re here to help.