¶ 🧠 Case Study: Faster, More Reliable PETG-HF Functional Prints
With the newly Helio-supported Bambu P1S, we tested how far we could push Bambu PETG-HF print performance on a functional lamp post fixture using Helio’s thermal simulation and optimization. Here’s what we achieved:
- ⚡ 34% faster print time (1h 5min → 0h 43min)
- 🧪 Improved thermal quality index (-0.15 → -0.13)
- 🎯 Surface quality and feature detail preserved
¶ 🧰 How to Try This Yourself
- Slice your Bambu PETG-HF model in Bambu Studio
- Simulate and optimise within Bambu Studio
- Review thermal results and tweak print settings if needed
- Print your model — faster, stronger, and just as precise
¶ ⚙️ Why This Object?
PETG-HF is increasingly used for functional end-use parts thanks to its balance of strength, fast printability, and weather resistance. However, achieving consistent performance can be challenging without proper thermal control.
This lamp post fixture is a real-world, functional part designed for outdoor use, where long-term durability and performance matter.
It includes:
- 🔩 Tight fit zones and mounting features which demand dimensional accuracy
- 🧱 Overhangs and thin vertical surfaces which demand accurate thermal control
- 🌞 Exposure to UV and temperature cycles, ideal for testing PETG-HF long-term use performance
🛠️ While this part wasn’t tested for long-term weather resistance, its geometry and real-world use case made it a strong candidate for evaluating how Helio optimization improves print speed and bonding in PETG-HF parts for real-world applications.
¶ 🧪 How We Tested It
To measure the impact of Helio’s optimization, we followed a controlled process.
¶ 1. Slicing & Initial Simulation
We sliced the model in Bambu Studio using the default PETG-HF profile to get a baseline for the original print time.
We then ran a thermal simulation of the original G-code (via Bambu Studio’s Helio plugin) to analyze baseline thermal behavior. This gave us the original average Thermal Quality Index (TQI) , a score used to predict bonding strength.
¶ 2. Slicing Parameter Adjustments
Before optimising, we manually adjusted two key slicing parameters:
- Smooth Coefficient = 0.2
→ Helps ensure smooth speed transitions when Helio modifies print speed - Pre-start fan time = 2s
→ Ensures fans start just before delicate regions to stabilize thermal behaviour
Leave overhang and bridge settings at slicer defaults or best settings based on your printer/material calibration.
¶ 3. Helio Optimization
We enabled optimize outer wall = yes, and ran an optimisation in basic mode. Basic mode balances bonding strength while squeezing speed where possible, with minimal user input.
Set Optimise Outer Walls = No if surface finish is your priority; set to Yes for maximum strength
For more information on optimisation settings, see our detailed optimsiation guide
¶ 4. Printing
To ensure the best print quality, we dried the filament beforehand and placed it in a dry box during printing (PETG-HF is hygroscopic). Both prints, default and optimized, were printed on the same Bambu Lab P1S using a 0.4mm nozzle to ensure consistent quality control and eliminate hardware-related variations.
¶ 5. Visual Comparison
We inspected both prints, paying particular attention to the rib detail and hole dimensions. This helps verify that Helio maintains dimensional integrity even at higher print speeds.
¶ 📚 Key Terms Explained
¶ 🔗 Bonding
Bonding is how well each printed layer sticks to the next one. Poor bonding leads to weak parts. Good bonding happens when the new layer melts into the previous one while it’s still warm.
¶ 🔥 Thermal Quality Index(TQI)
This value helps us understand how close the print temperature is to ideal conditions for bonding. It ranges from -1 to +1, where:
0= perfect bonding temperature< 0= too cold, poor bonding> 0= too hot, risk of deformation or sagging
💡 Note: More green= better layer bonding
¶ 🧪 Tensile Strength (MPa)
How strong the part is when pulled apart. Higher MPa = stronger print.
¶ 🕓 Print Time
Total time the printer takes to finish the job. Faster is usually better, as long as it doesn’t hurt quality.
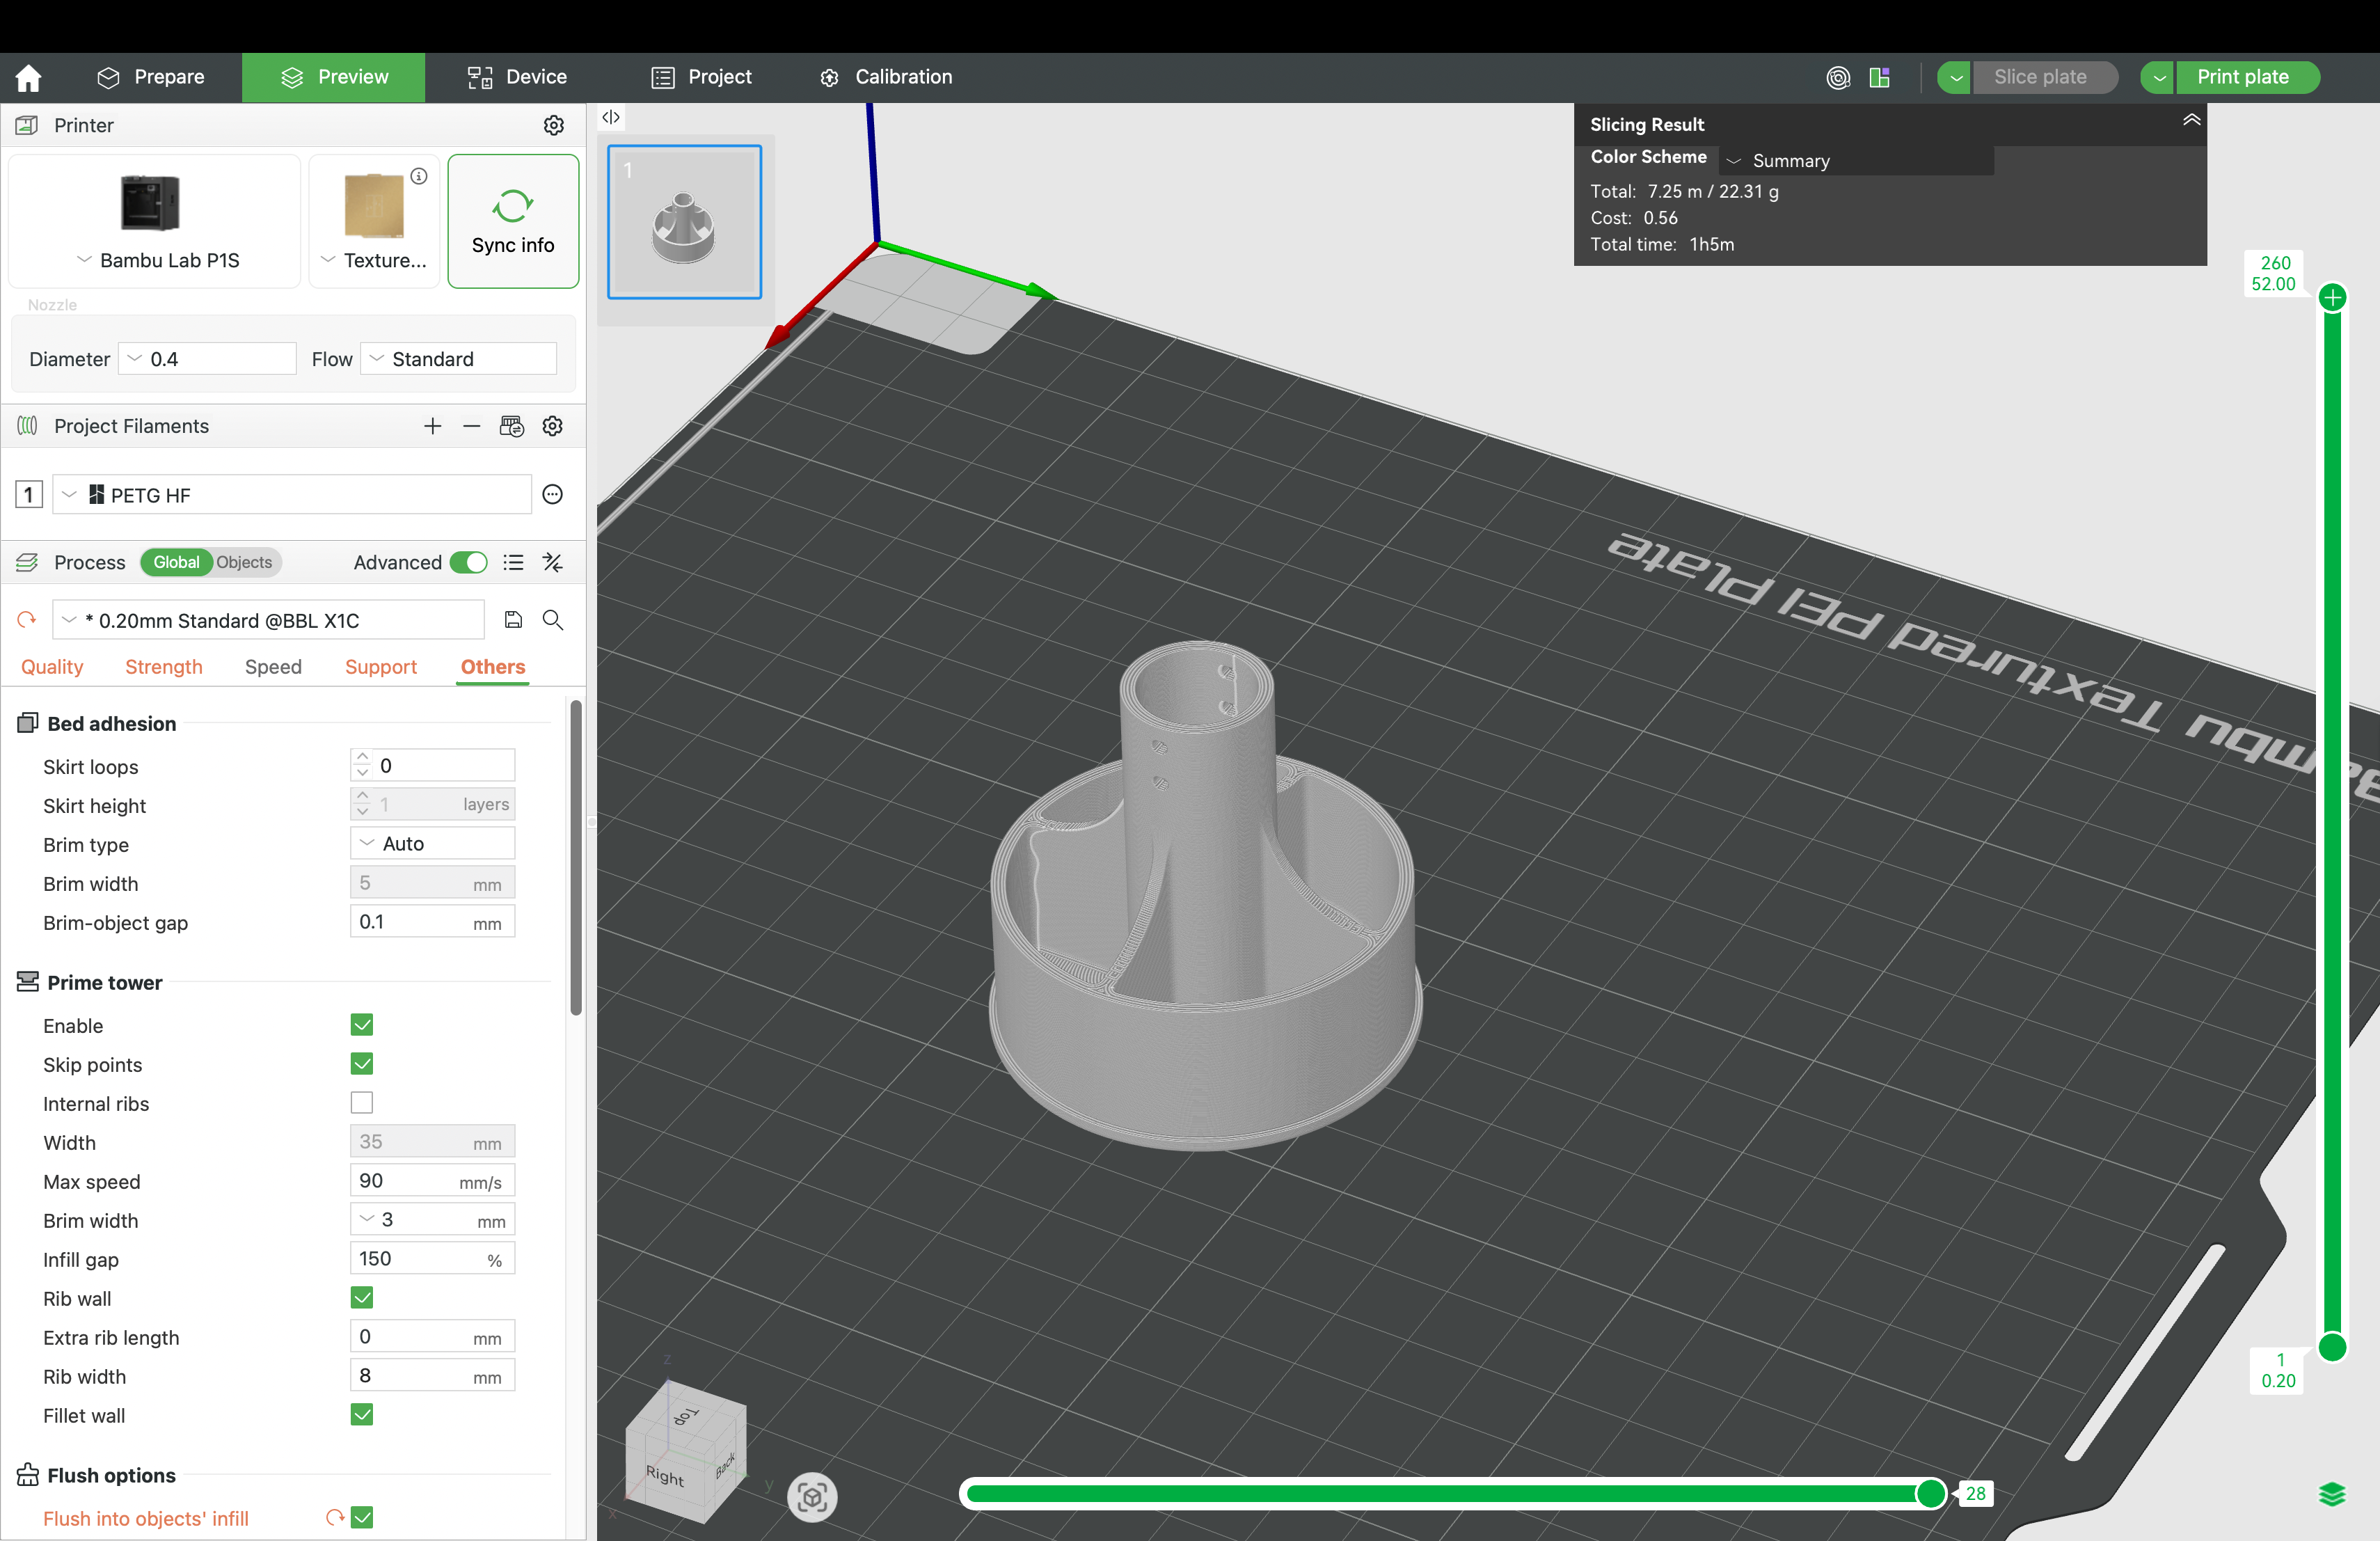
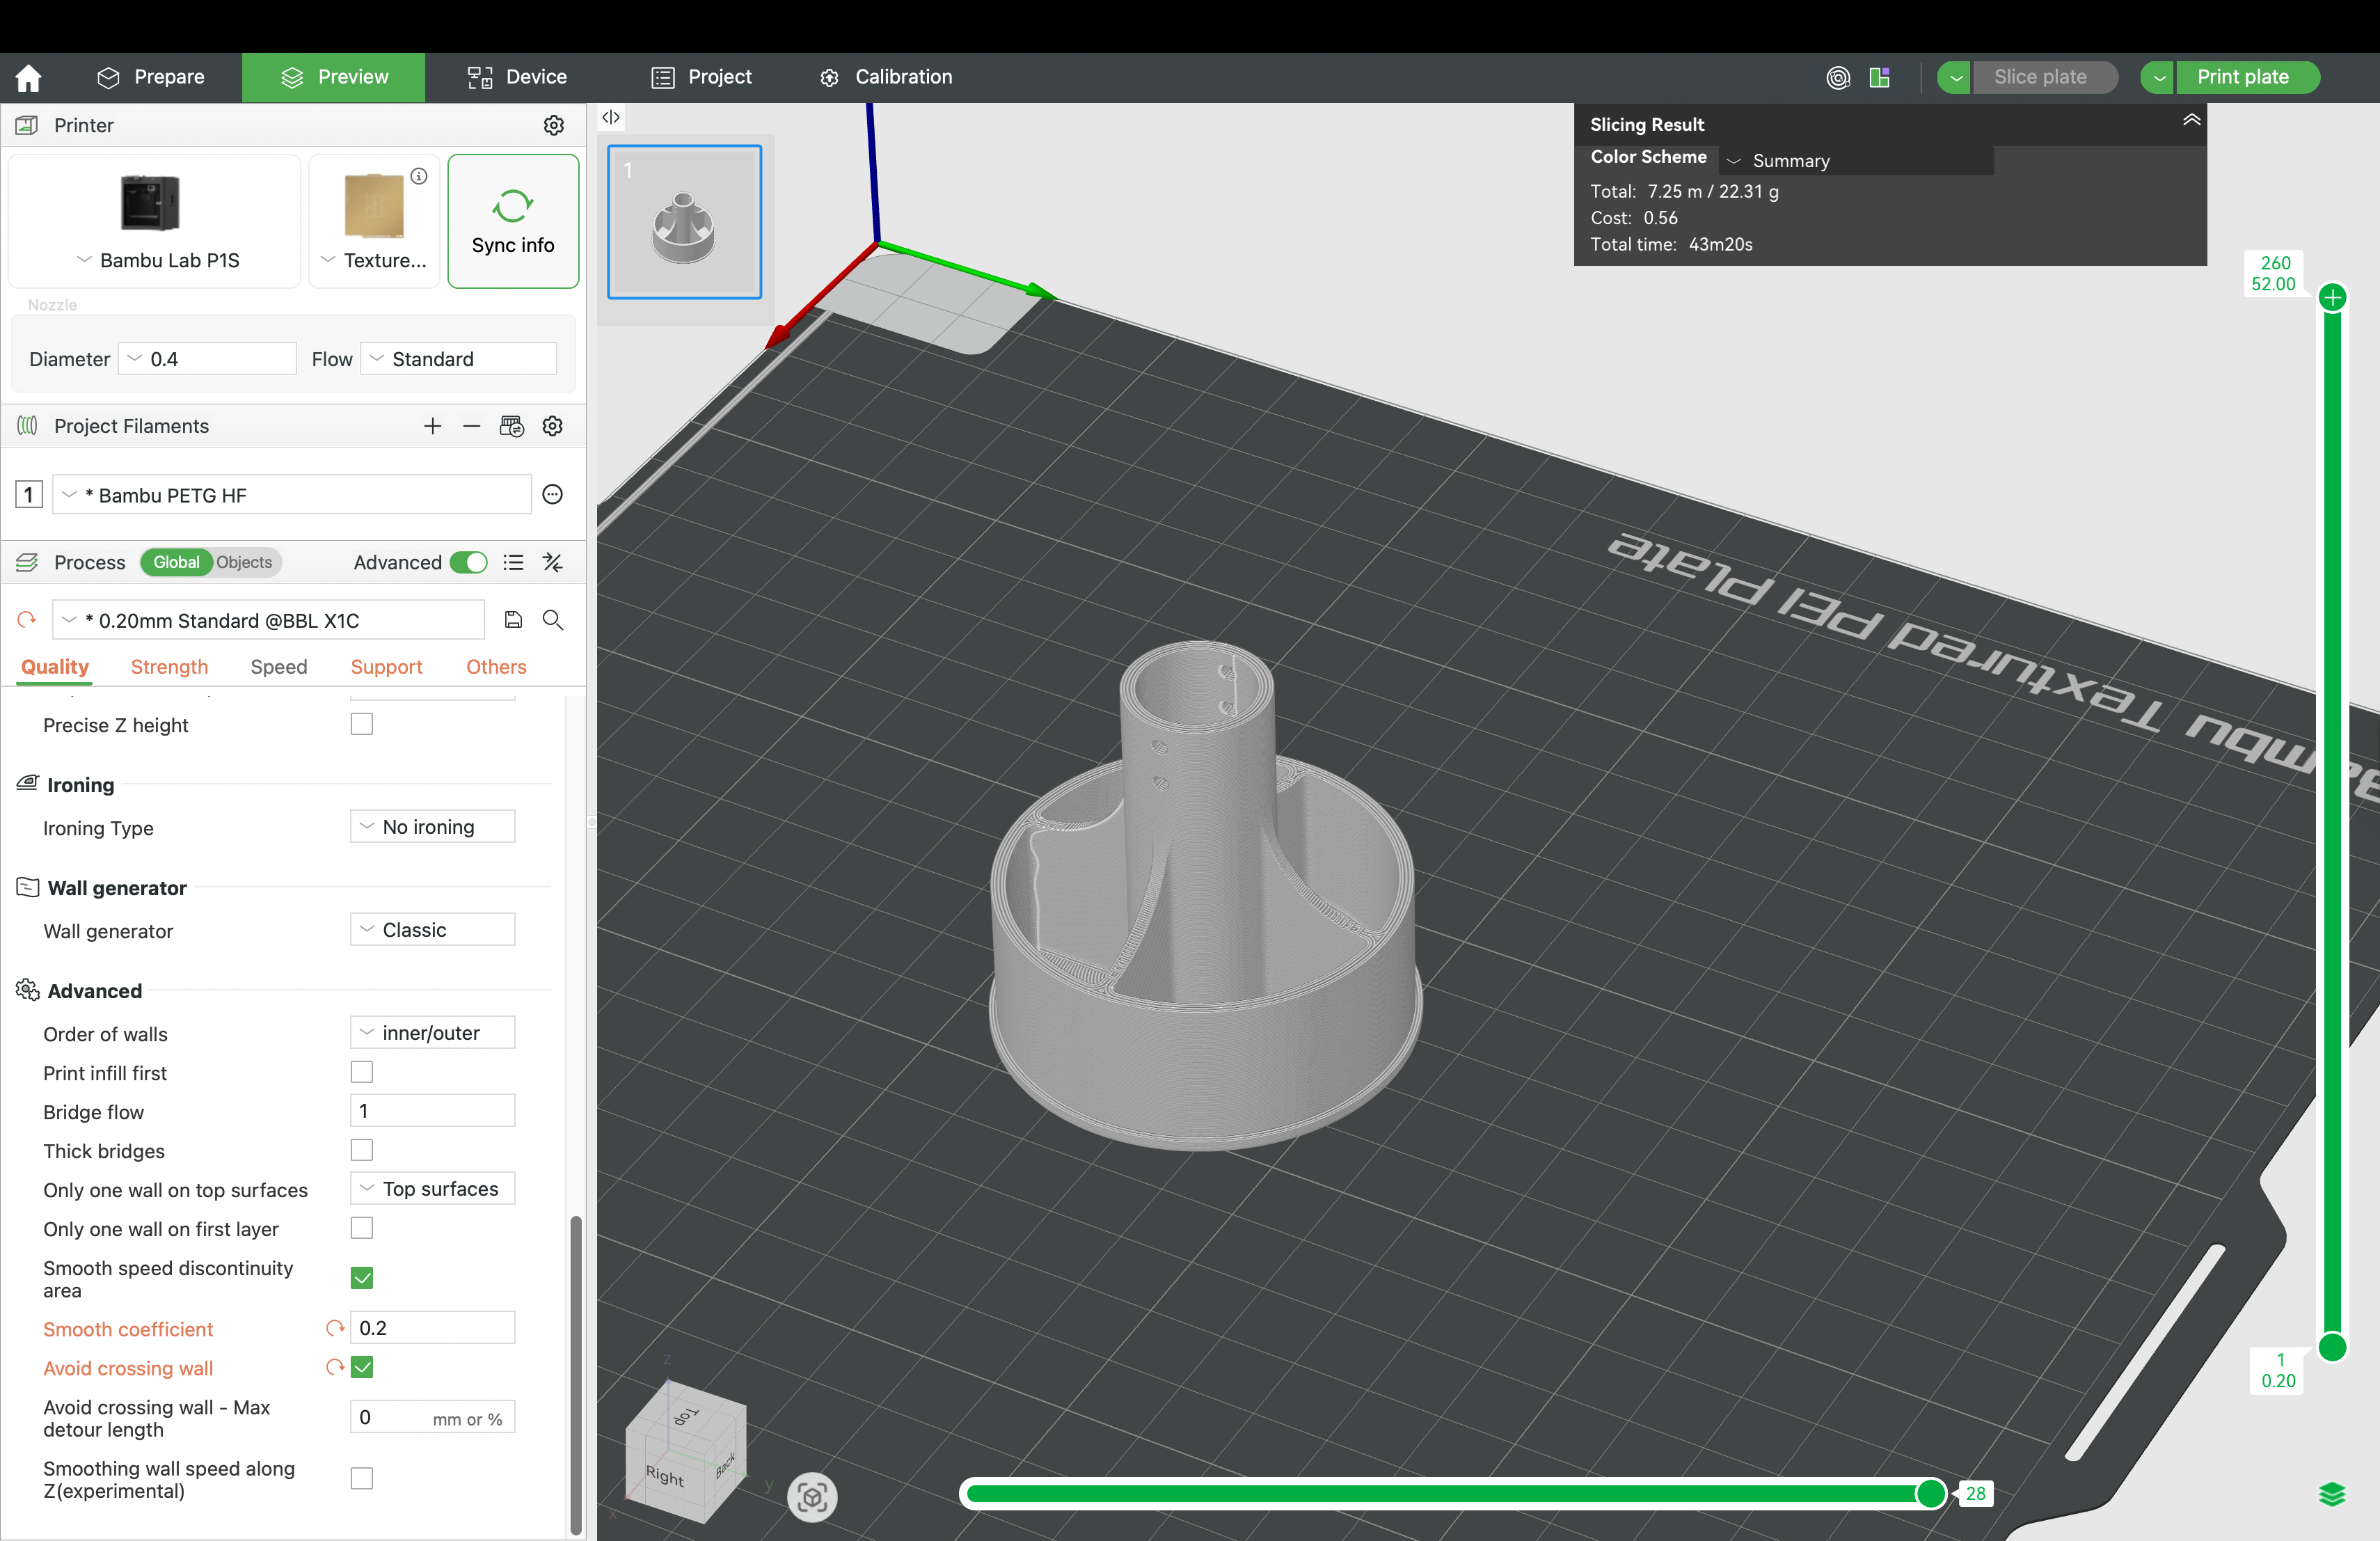
¶ 📊 Results Summary
| Metric | Original | Optimised |
|---|---|---|
| Print Time | 1h 5min | 0h 43min (-34%) |
| Average Thermal Quality Index (TQI) | -0.15 | -0.13 (13% better) |
| Surface Quality | Good | Good (maintained) |
¶ Visualising the Improvement
¶ Original
¶ Print Time
¶ Thermal Quality Index
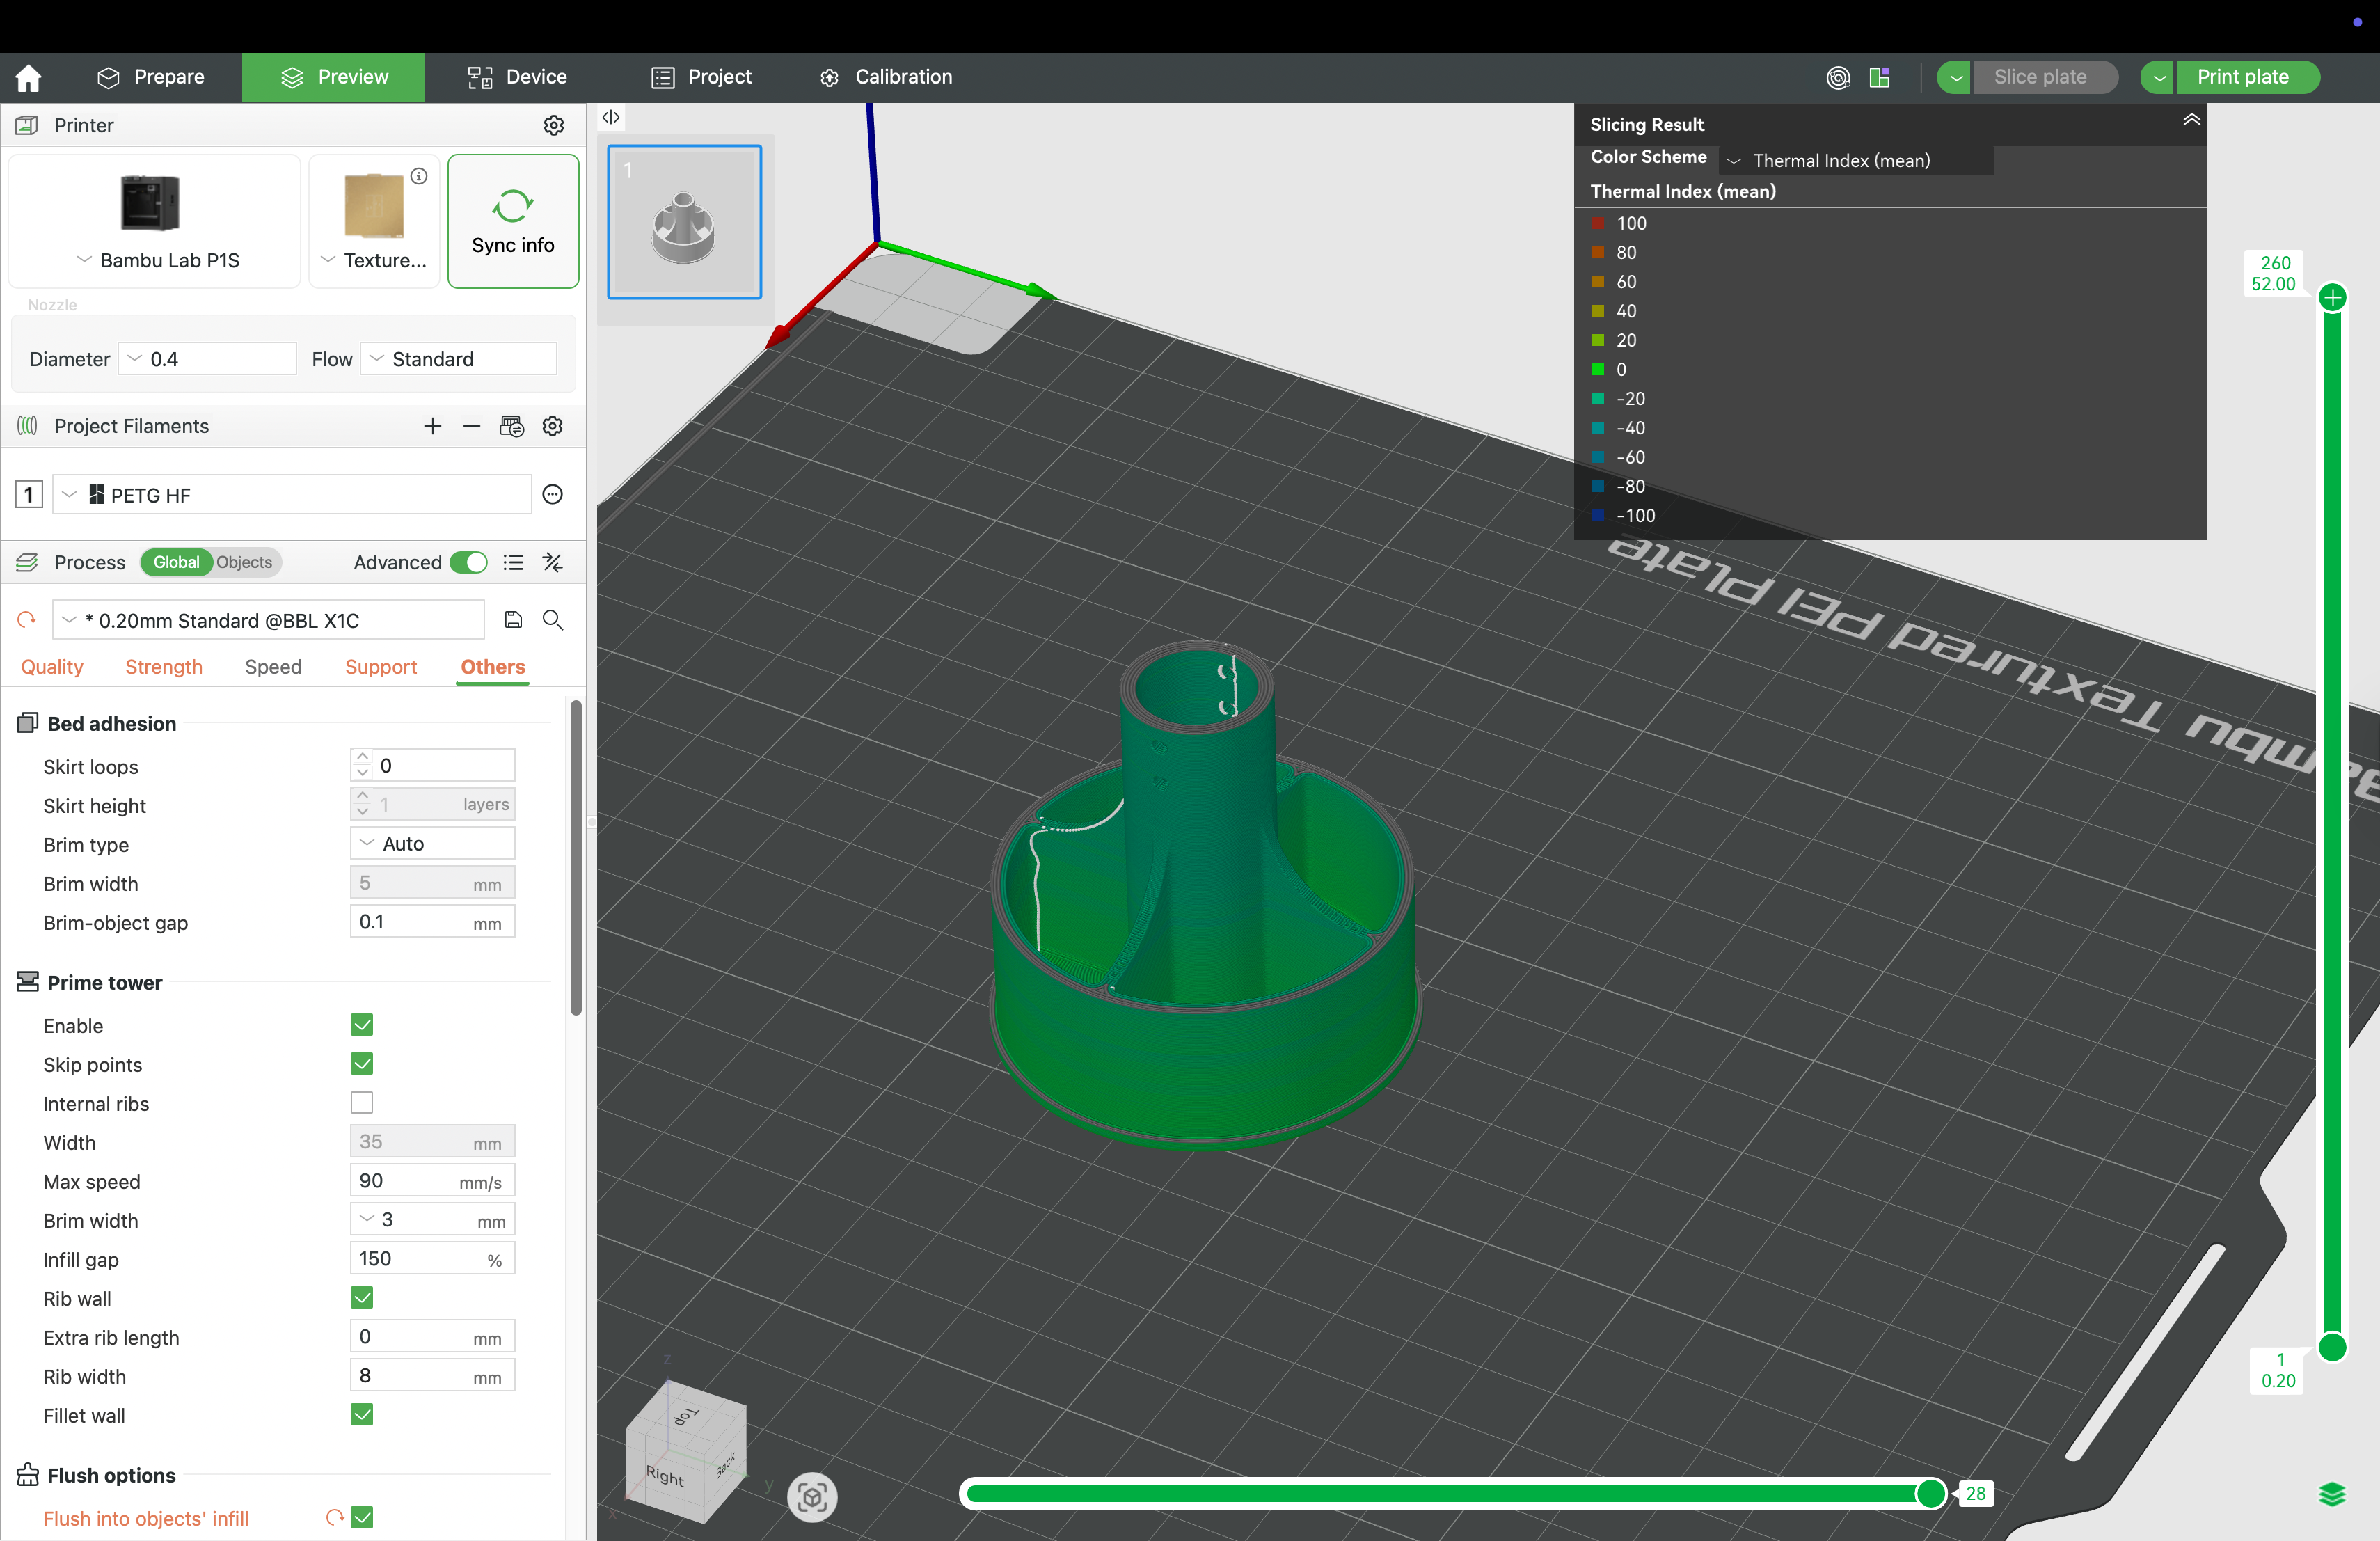
¶ Optimised
¶ Print Time
¶ Thermal Quality Index
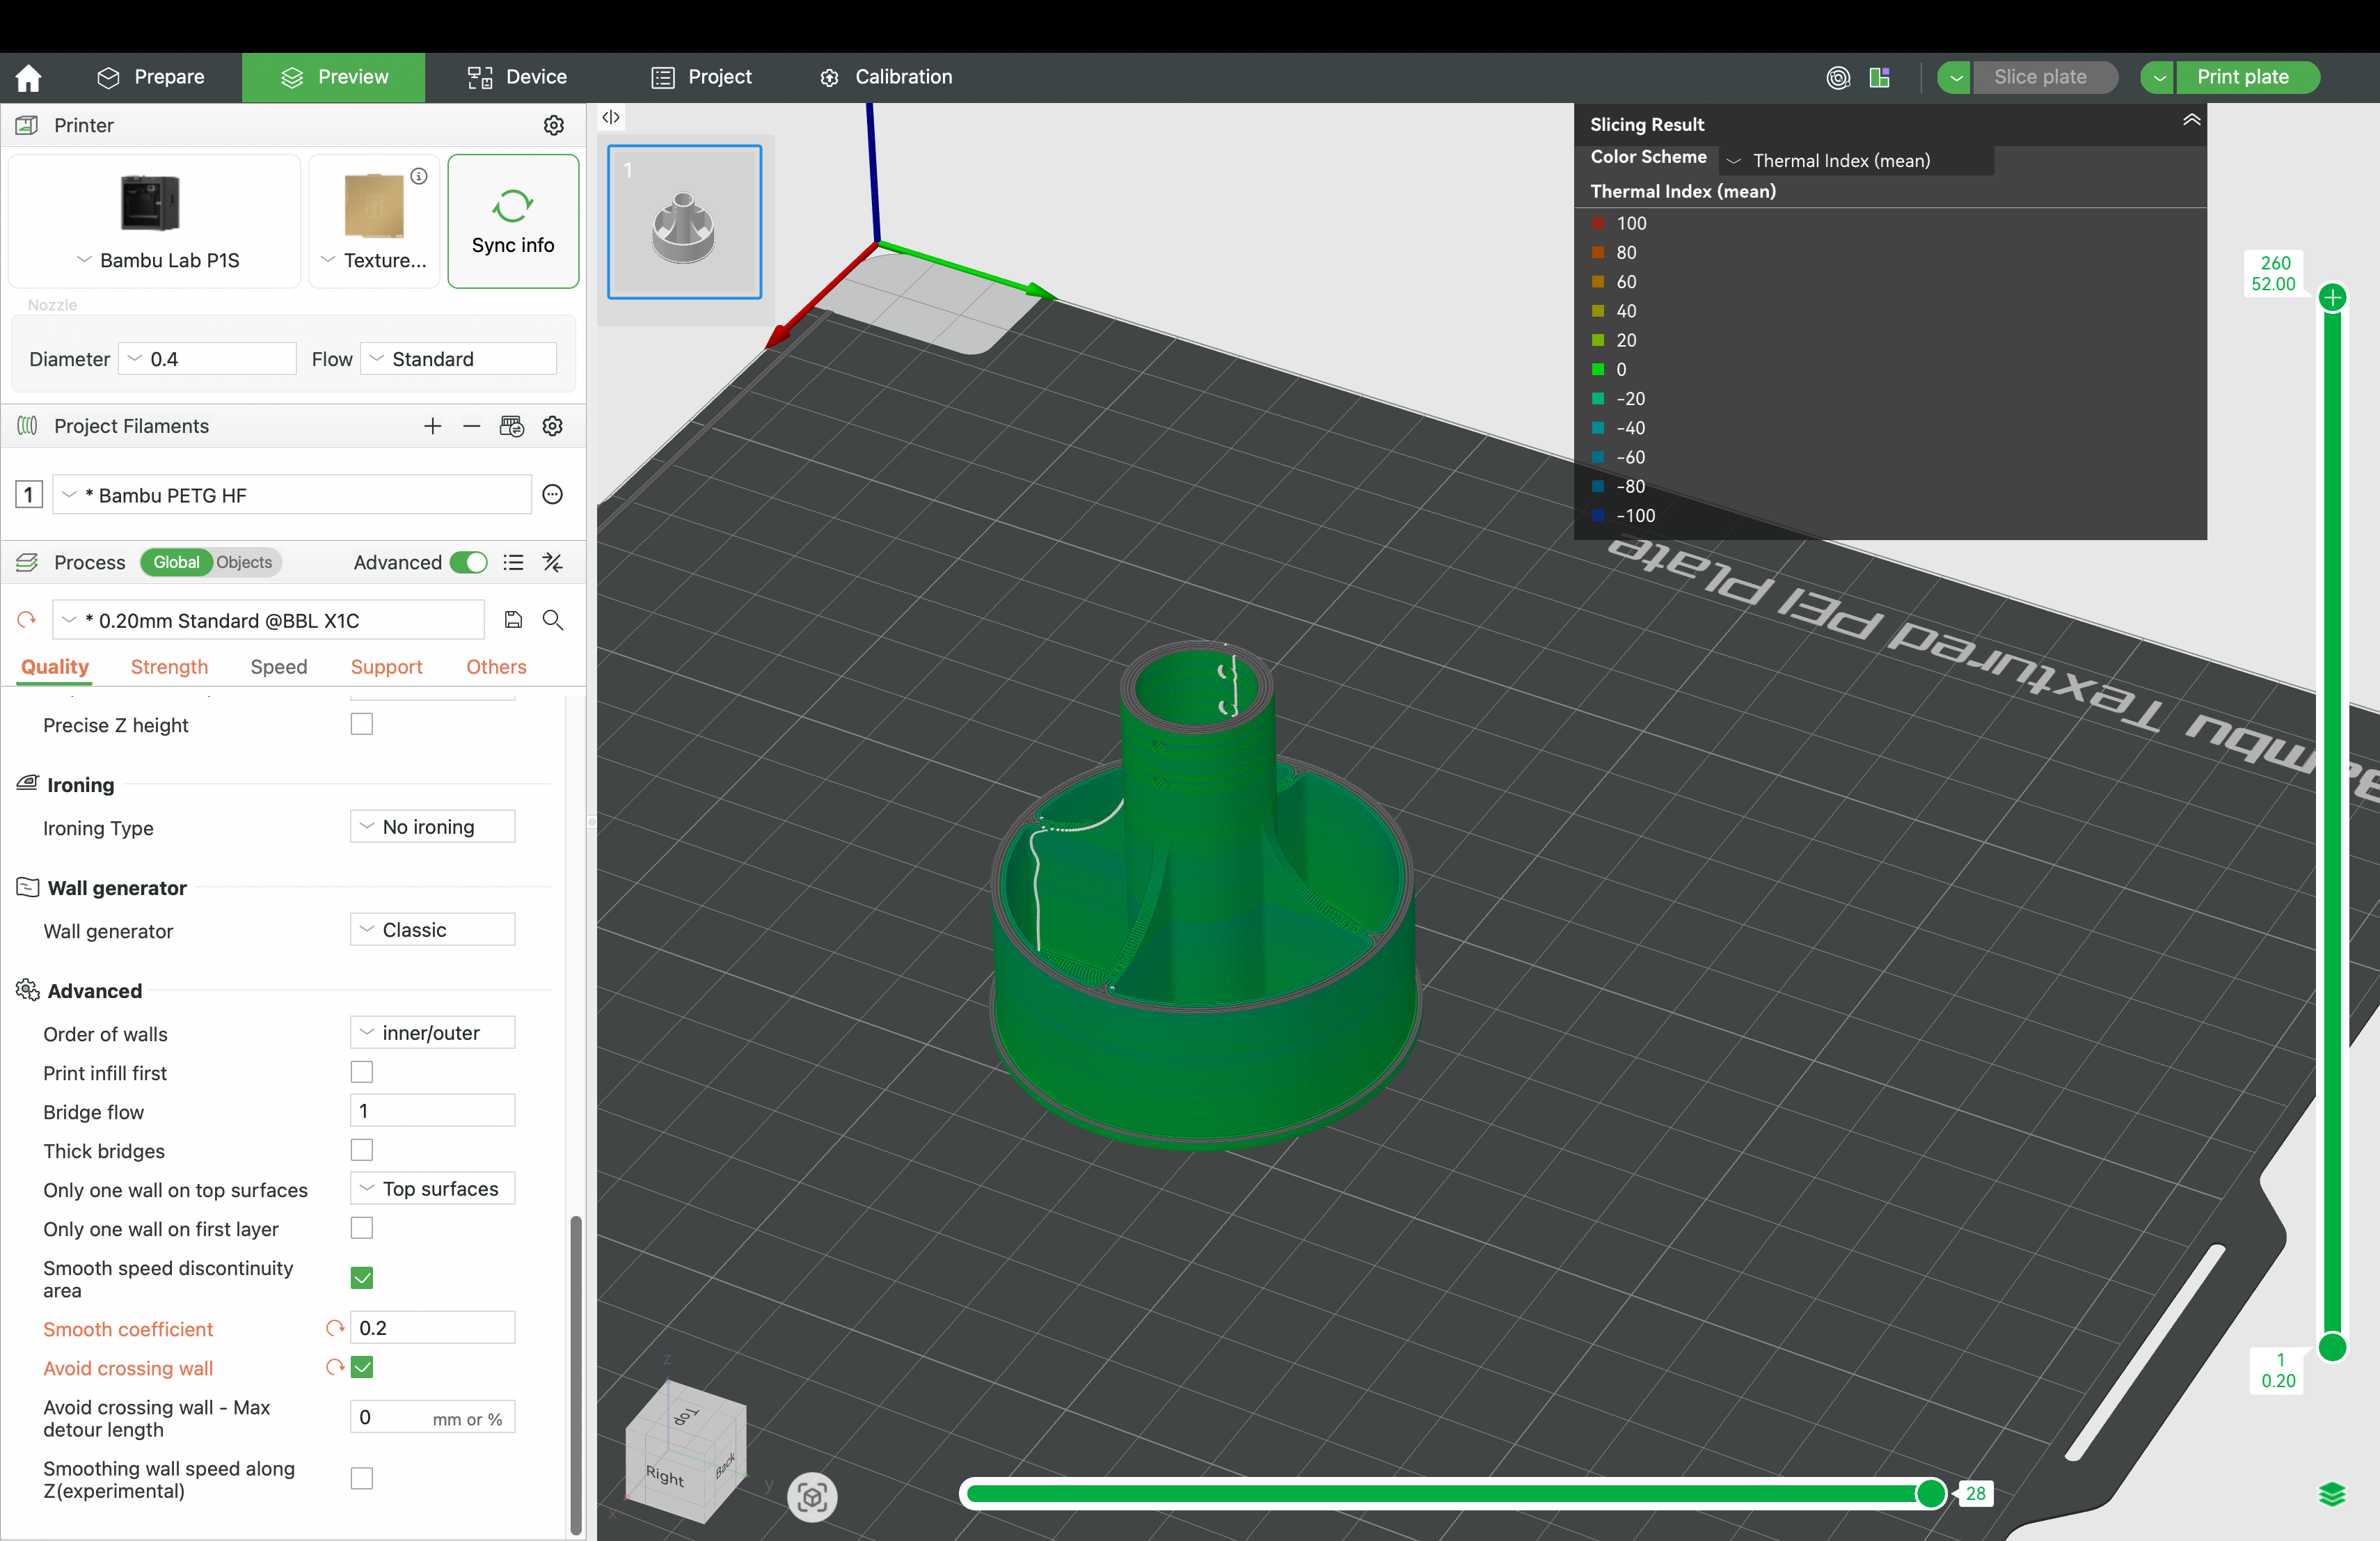
The print went from being too cold in the upper regions to being in the ideal temperature for layer bonding after optimization. In real-world applications, this translates to improved tensile strength, and greater long-term durability.
In under three minutes, Helio delivered a faster, stronger, and more reliable print, significantly reducing the need for manual tuning while also providing valuable thermal insights on print performance.
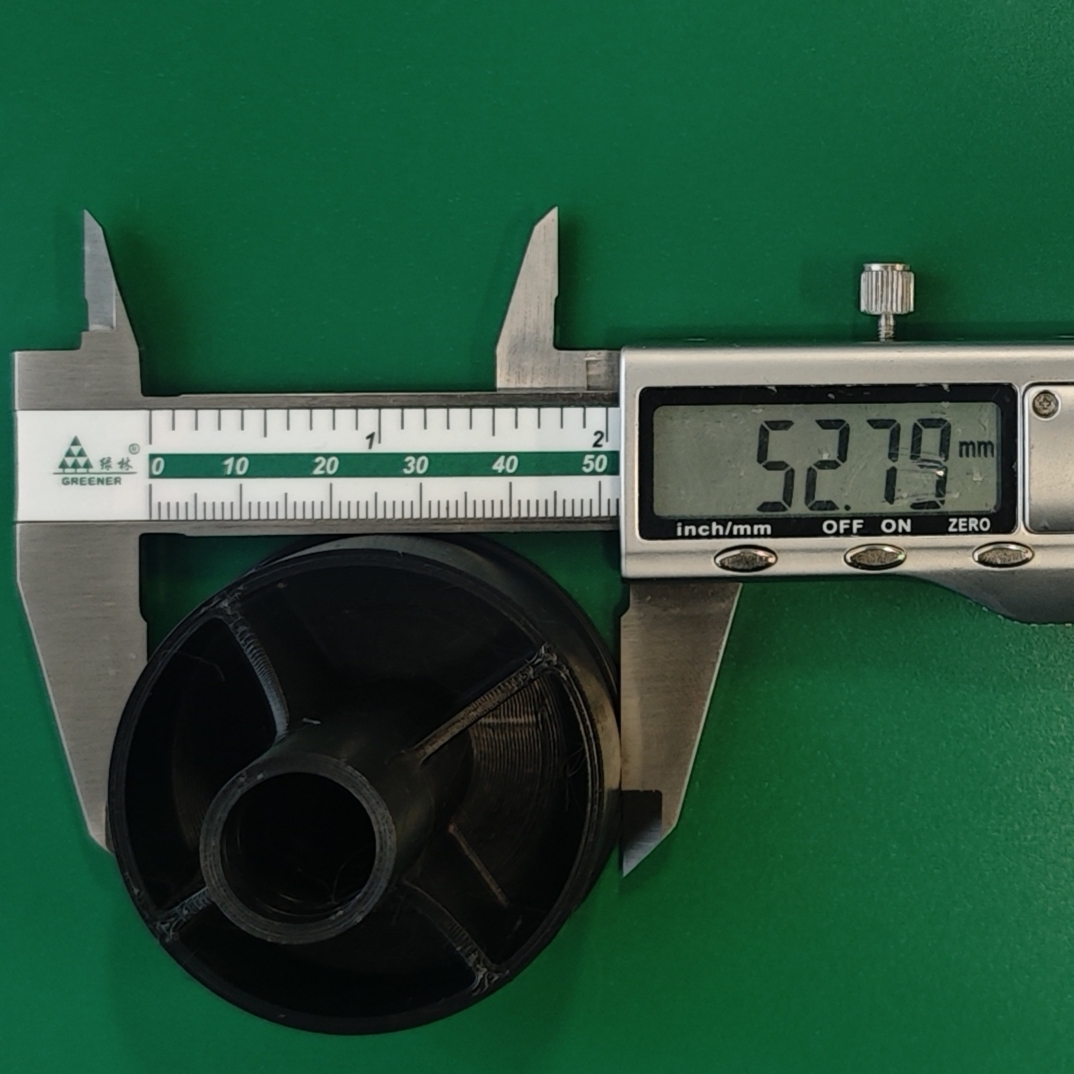
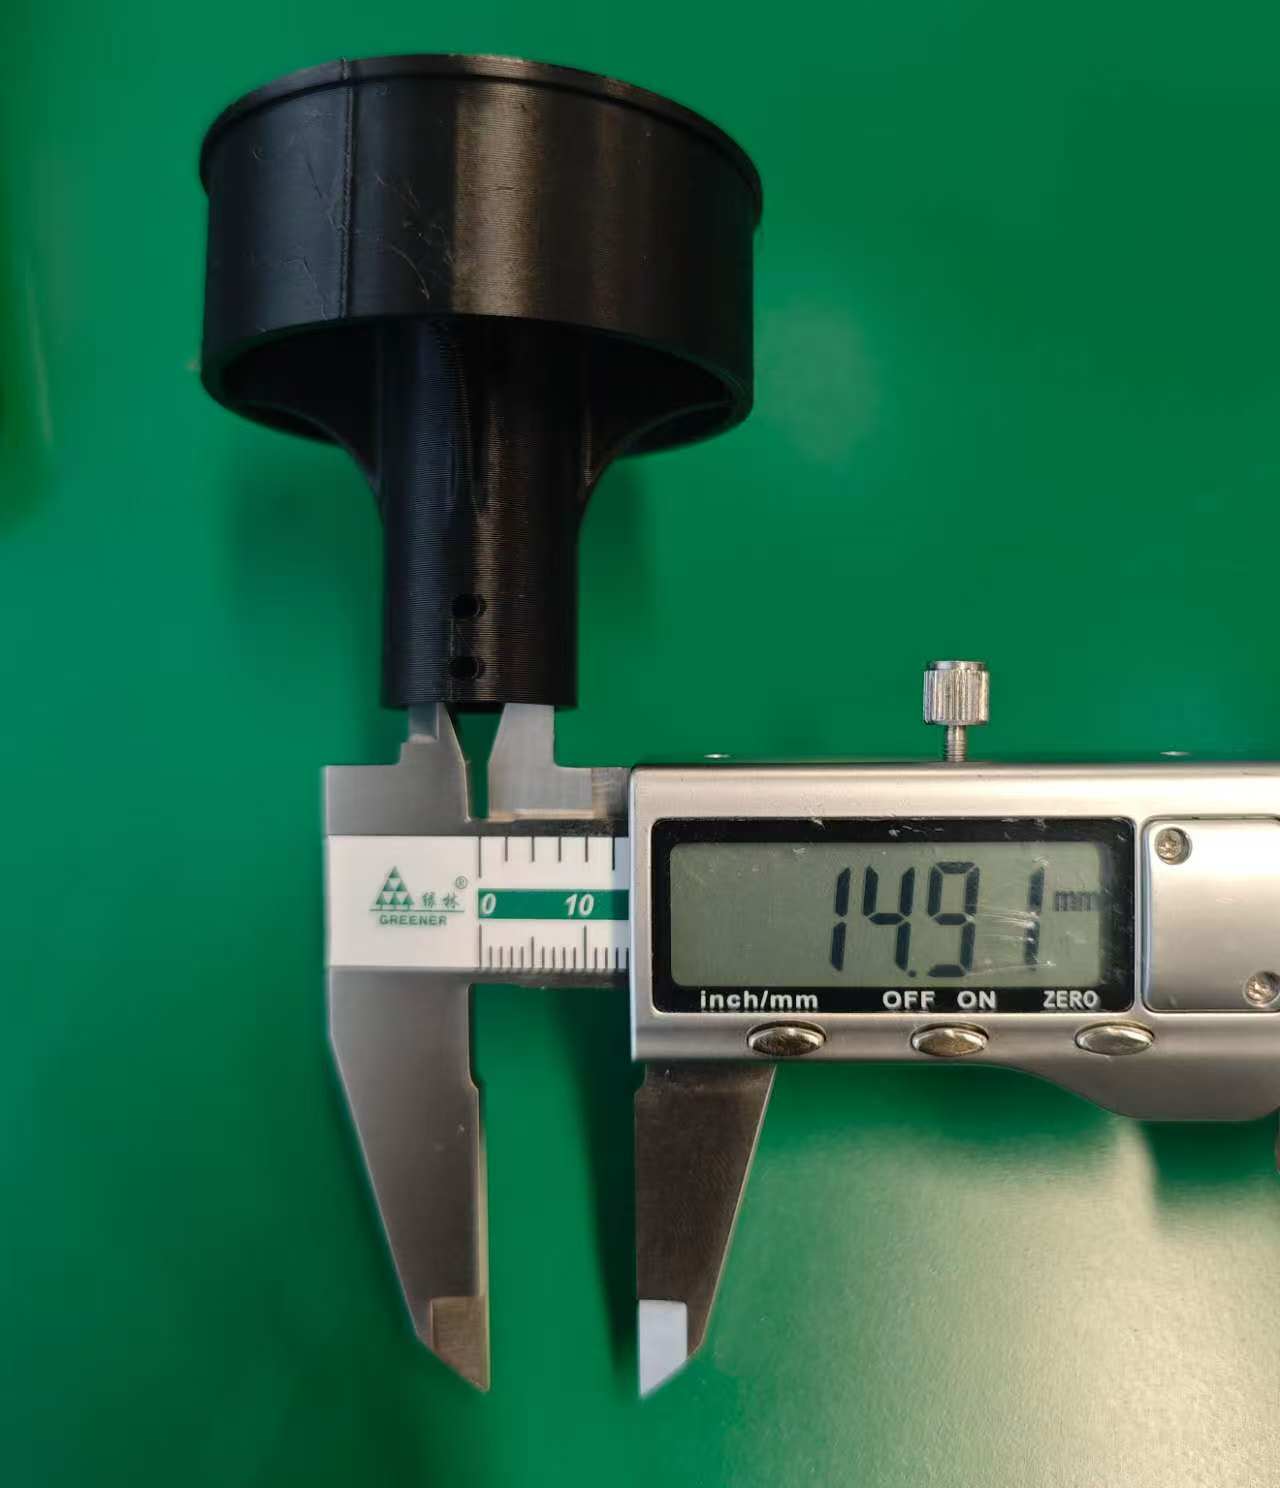
¶ Dimensional Accuracy
¶ Original
¶ Optimised
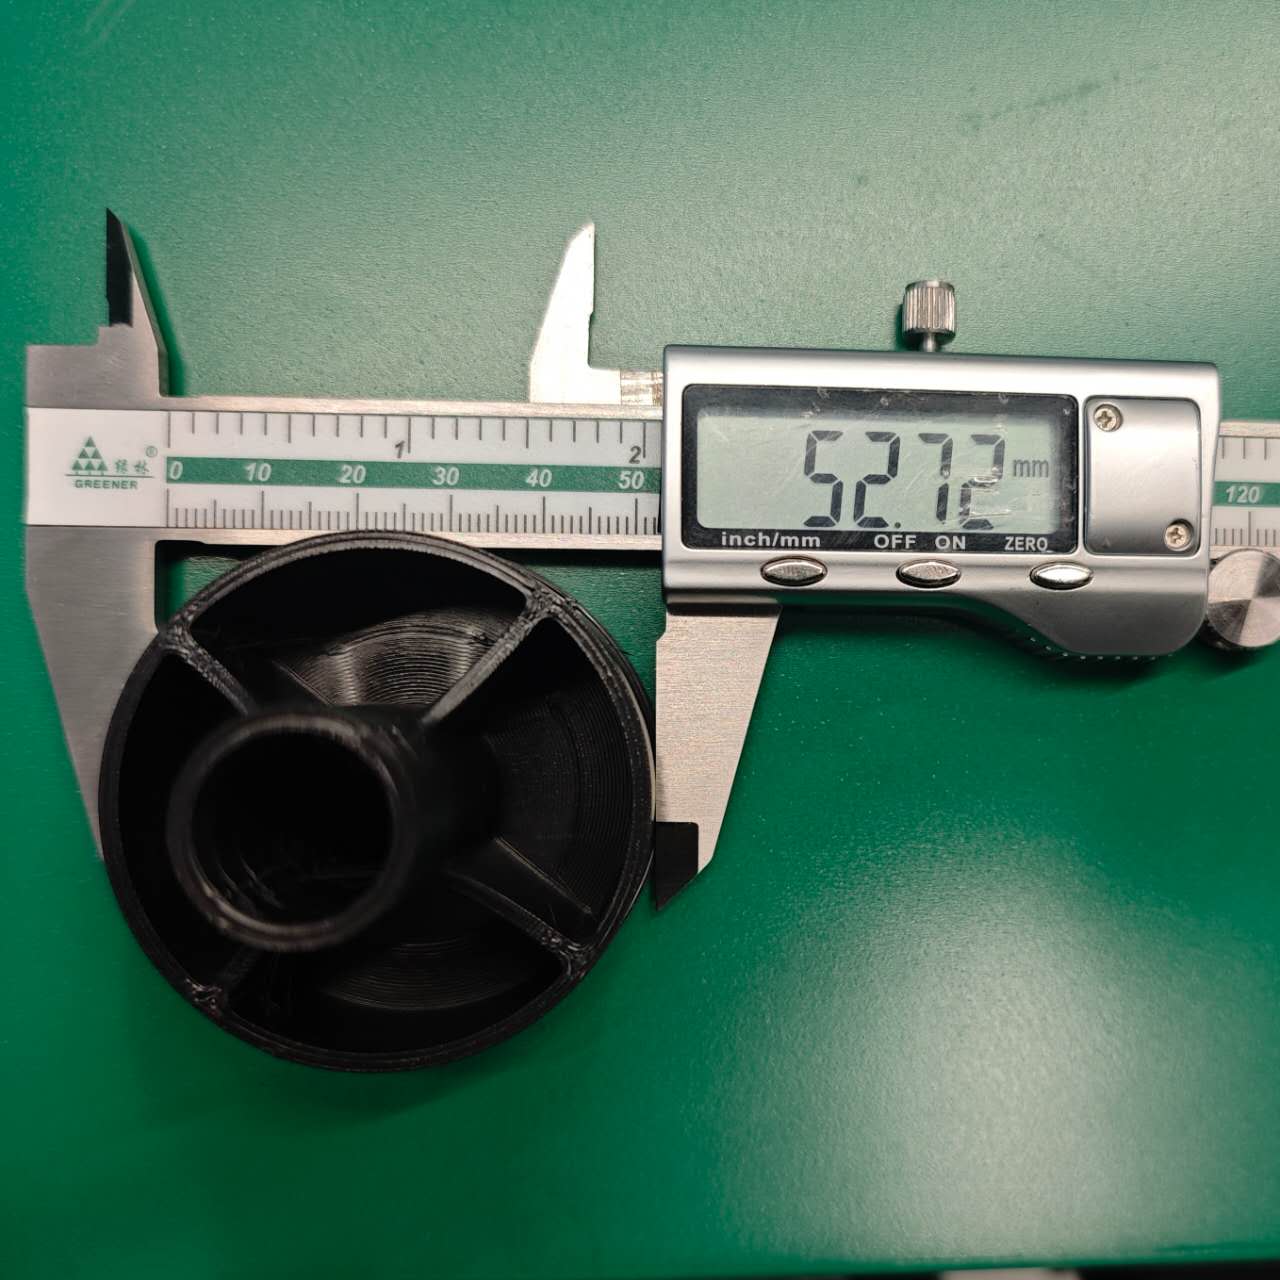
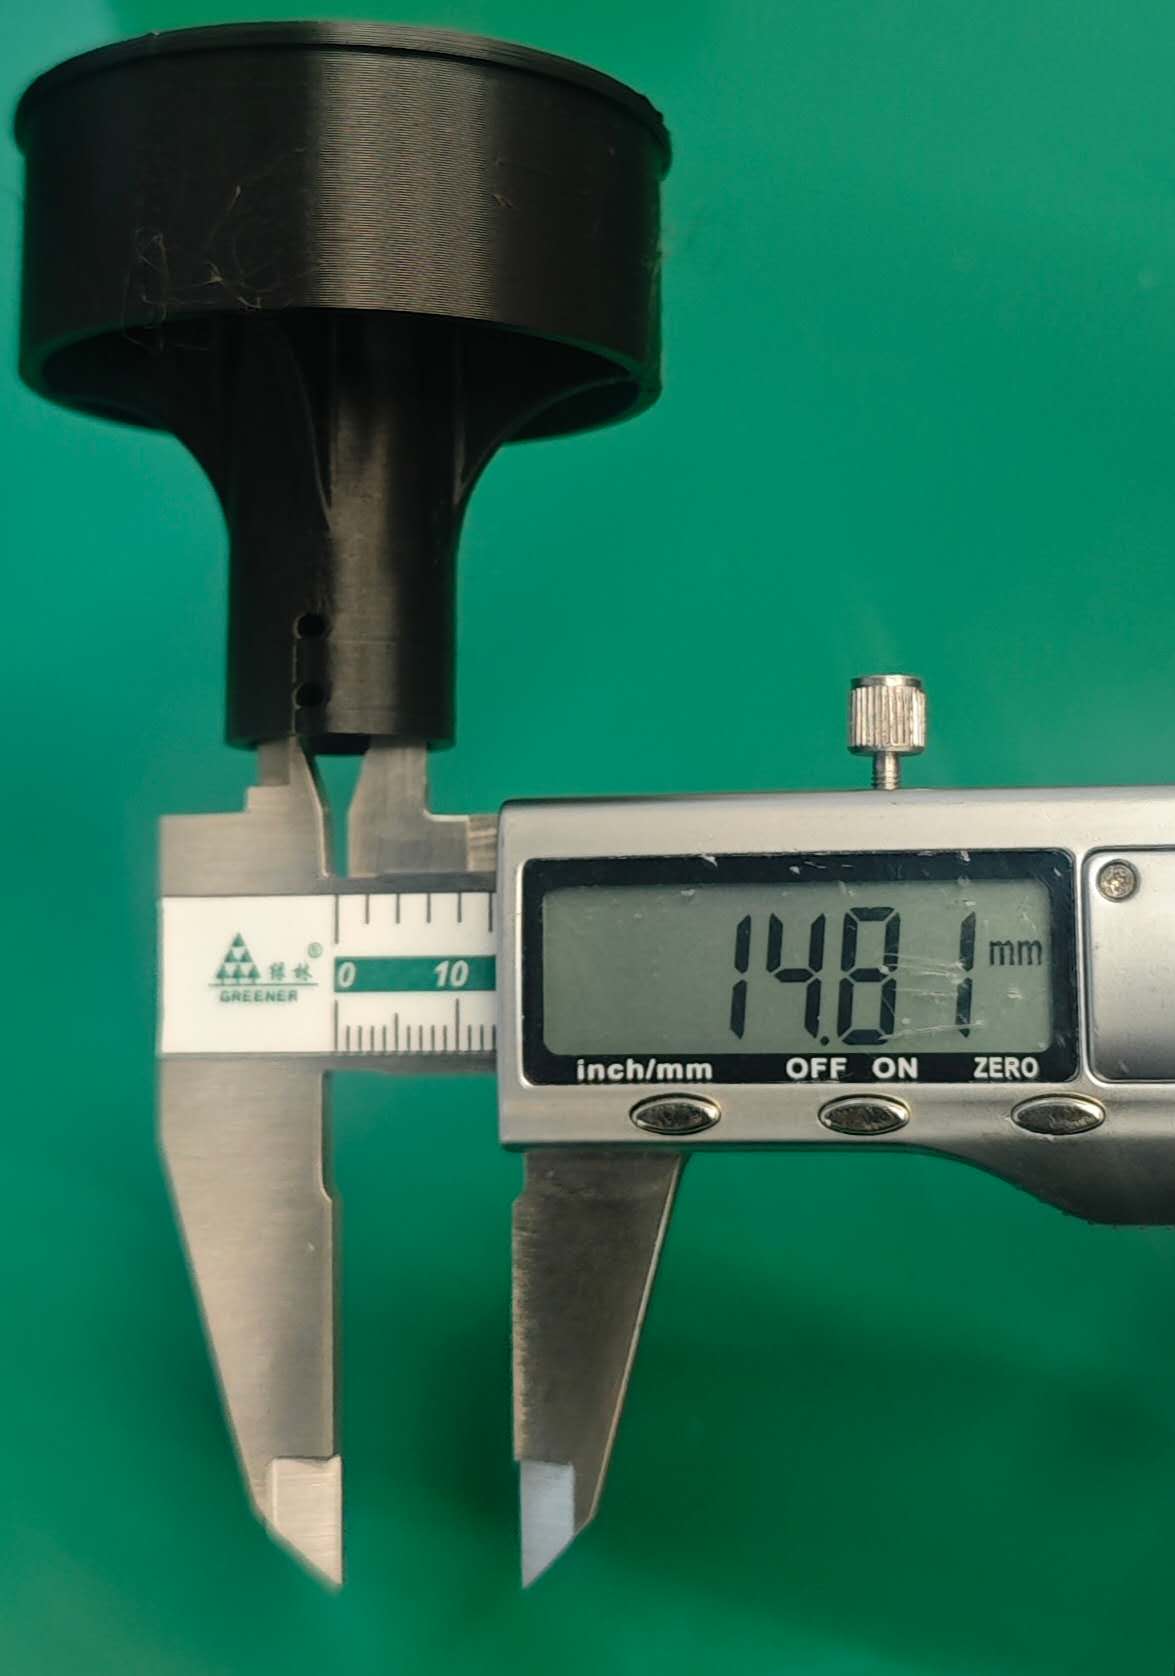
- ℹ️ The object was designed to be mounted on a post inner diameter ~53mm and wooden pole with outer diameter <15mm.
- 📏Dimensional deviations between the optimized and original prints were minimal: ~0.09 mm for the outer diameter and ~0.10 mm for the inner diameter.
- ✅ Even at faster speeds, the optimized part maintained the required dimensional accuracy. Faster print speed ≠ poor print quality
¶ 📈 What This Means for PETG-HF
PETG-HF allows faster estrusion and printing, but this can also lead to overheating. Without careful thermal control, this can cause drooping, stringing, or dimensional issues.
This makes proper thermal management essential to fully unlock the benefits of the material and printer, a process traditionally filled with guesswork.
Through this real-world case study, we demonstrated how Helio optimizes speed using thermal-physics-based simulation and optimisation, keeping each layer within the ideal bonding “sweet spot”, while also helping you:
- 💪 Improve strength without risking overcooling or overheating
- 🕓 Reduce print time without sacrificing quality
- ✅ Eliminate guesswork from your print process
¶ 🧭 Final Thoughts
When printing strong, functional parts like brackets, tools, or other load-bearing components, default slicer settings aren’t always enough.
With Helio Additive’s simulation and optimization, you can:
- 🔥 Enhance thermal consistency layer by layer
- ⏱️ Cut down print times while maintaining quality
- 🧠 Make smarter choices, like fine-tuning cooling, using real performance data
¶ 📂 Test files
We’ve provided both the original and Helio-optimized .3mf files, so you can review the differences directly in your slicer or replicate the test on your own printer.
The original model was shared by Sakiffi under the Creative Commons BY-NC-SA 4.0 License.
You can download it directly here, or down below:
- 📁 Original .3mf file
- 📁 Helio-optimized .3mf file (ready to view optimised TQI and print)
✅ Ensure your printer is in good working condition and your material is dried for best print results.